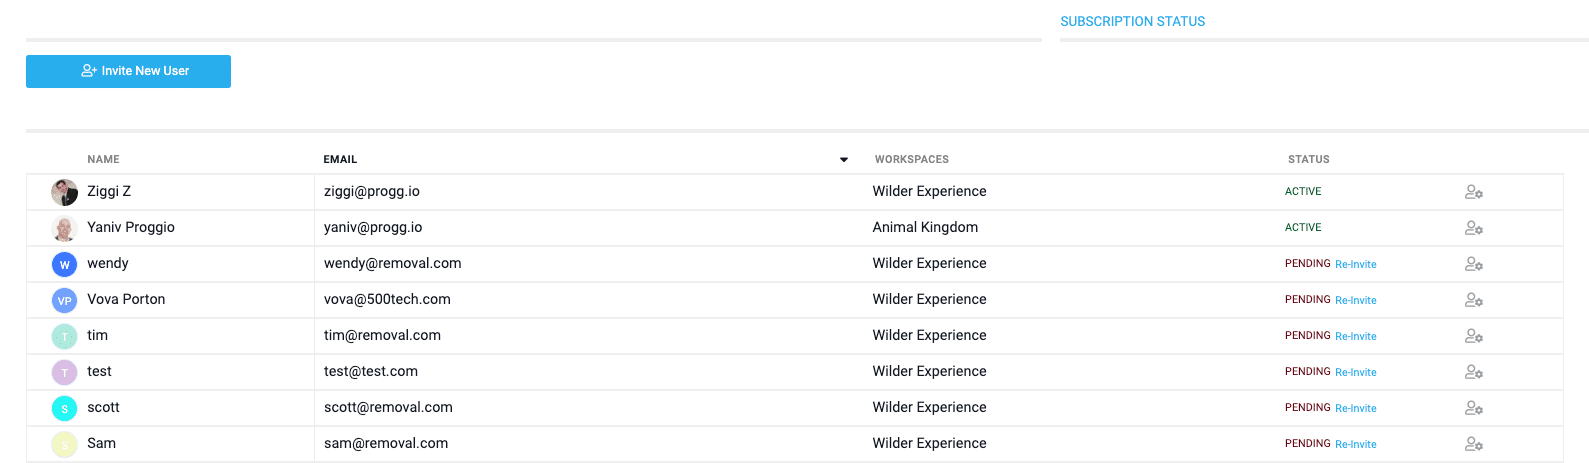
Before you can manage a Space on Proggio, you must have ’Admin’ access and preferably you need additional members in your space besides yourself. Inviting members is easy and can be done from any page in the application from the ‘Tools‘ menu > ‘+Invite User‘.
Users can have the following Permissions within your Space:
- Admin Access level: Carries permission to access all features and configuration settings, including administration rights to manage preferences for all Space members. Admins have complete access to all projects associated with the Space’s portfolio. An Admin will usually be a Project Owner or an Executive manager within the organization. There can be more than one Admin in a Space, though it is not recommended.
- Editor Access level: Permission to create, edit and assign activities across multiple projects within the Space. Editors may have various roles within their organization but will typically take an active part in the planning or execution stages of the project. Editors may also be limited to edit only their own assignments if certain restrictions are required.
- Viewer Access level: Can view all projects, activities and tasks in ‘Read Only’ mode, as long as they have access into the project within the Space. Viewers can have different roles within an organization or within the Proggio Space but all carry restrictions to view only.
Each user permission can be accompanied by a specific Role:
- Executive Manager: In some cases, different functions in management require access to the Space for monitoring and collaborating around the project info. Execs may or may not need to have permissions to edit the information but in many cases would require permission to access the information.
- Project Manager: Usually take an active part in the project or portfolio planning. Accompanied with Editor access is ideal for a group of project managers operating within the same Space.
- Task Owner: A somewhat restricted role which allows the users to access project information relevant to them. A task owner who is assigned an Editor access will be able to create and adit assignments within its scope. For example, an Activity container assigned to an Editor Task Owner would allow such user to delete or create Tasks within the boundaries of the Activity only.
- Guest: Regardless of the access level, a guest will only be able to access project / portfolio information in ‘read only’ mode.
Users List: Navigate to the Team Settings option from the left side panel within the application.
Shows you a detailed list of all users. As the team Owner, you have administrator access to edit information of the users in your team.
Group List: Create internal groups within your team. Useful when managing a group workload instead of a single person is required. Usually this is applicable in development team but can be valuable also to represent departments like a group of designers or content writers. The initial setup for a group is done from a user profile (see below section).

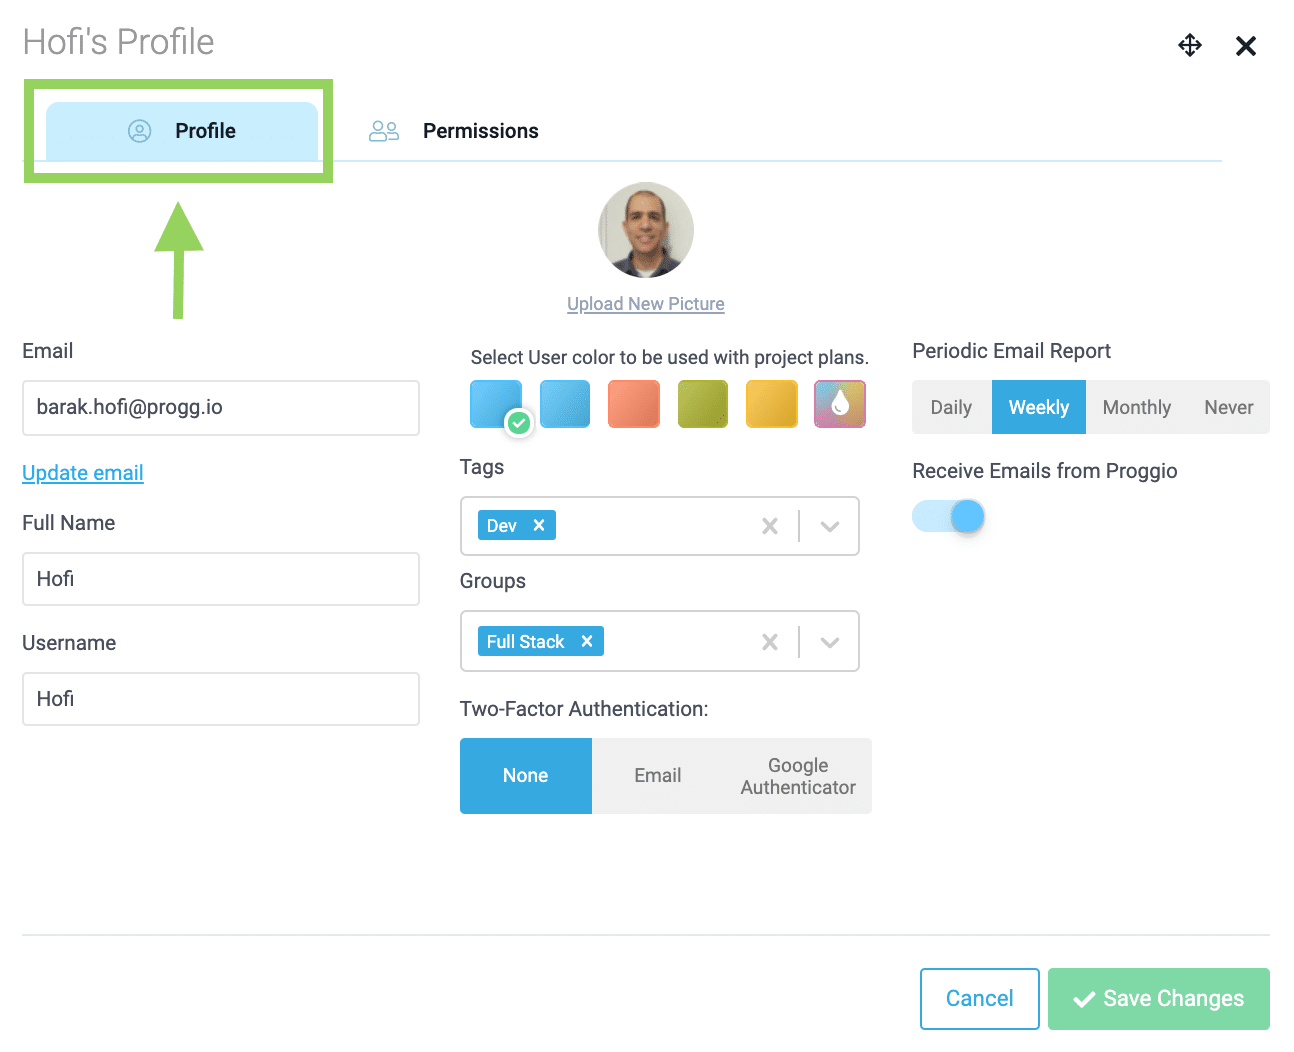
User Profile: A personalised profile for each member on your team

- Upload a profile picture and edit details such as the user’s Name or Email. Updating an email address can be useful when reassigning responsibilities from a user who left the team to a new member.
- Customize a unique color for all tasks/activities belonging to that user. This will automatically assign that color to activity blocks across all Project Plans.
- Insert Tags such as the department name to distinguish between your team members. Useful in status meetings on project updates when reporting on team performance. Tag filters are available on various views of the application.
- Use Groups identifier to create generic groups within your team. This is useful when planning your resources on a department level for example towards an upcoming project or projects. Helps you and your management understand the scope of work involved in certain activities on a less granular level. Check out the article on Resource Planning for more info on managing workload.
- Manage the team’s login security level, periodic email preferences & frequency.
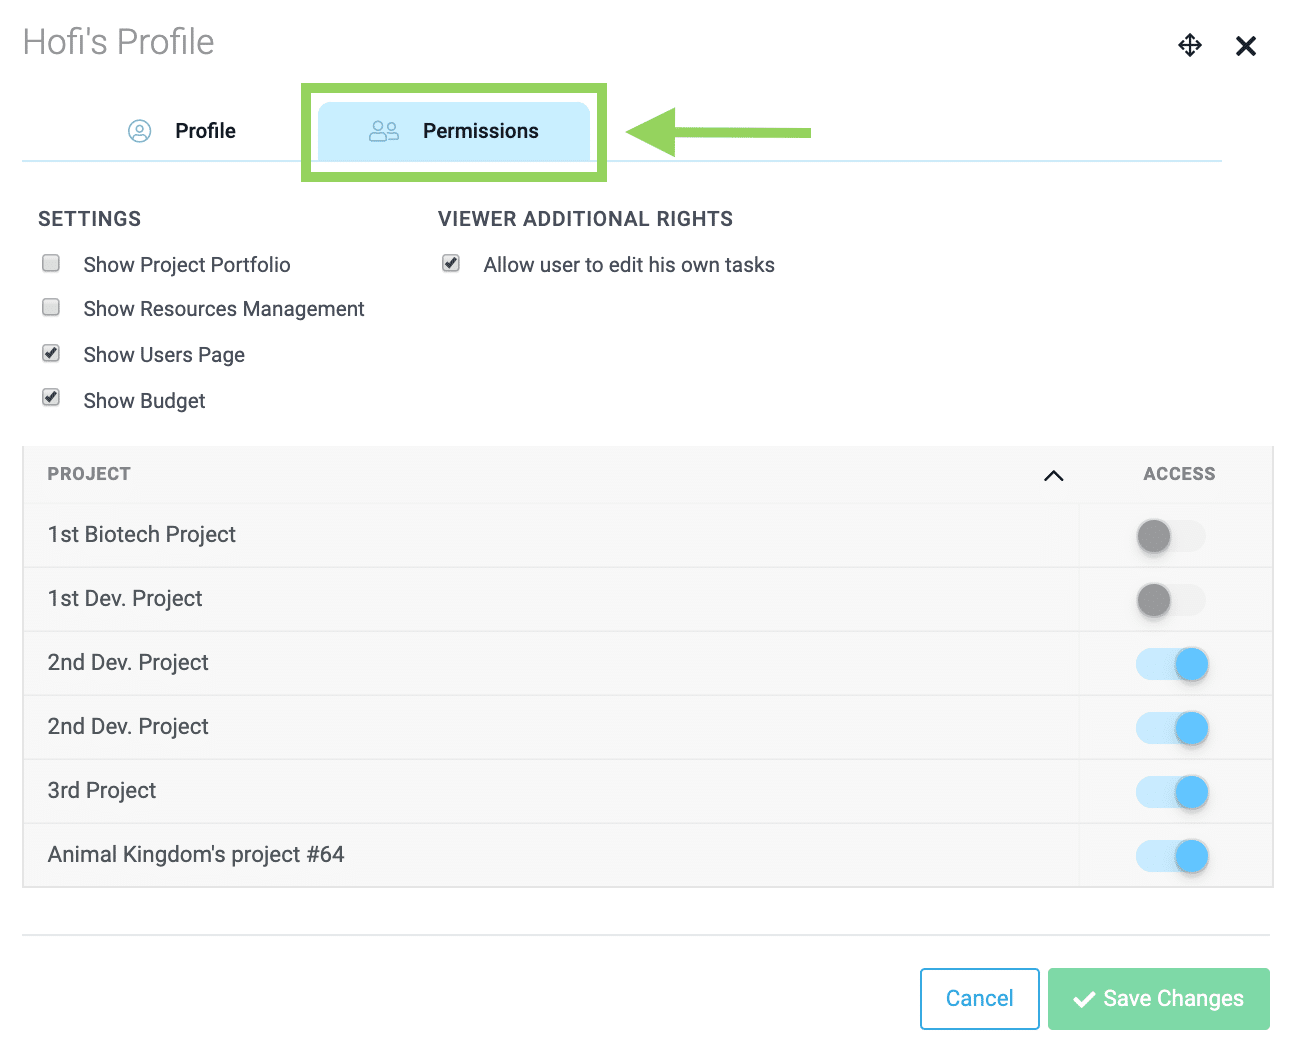
User’s Project Access: A list of all active projects within the team
- Select the appropriate access level of your users, into each project in your team.
- Manage which specific views you’d like to grant access to within the application.
Payment Overview: View information regarding your subscription plan such as type and number of projects created, active team members, next payment date etc.
Pricing Plans: Quick access into the billing page where you can subscribe to any of the paid plans.
Team Settings: Modify basic team information and customize your preferred status stages. For development teams, you can also define sprint preferences.
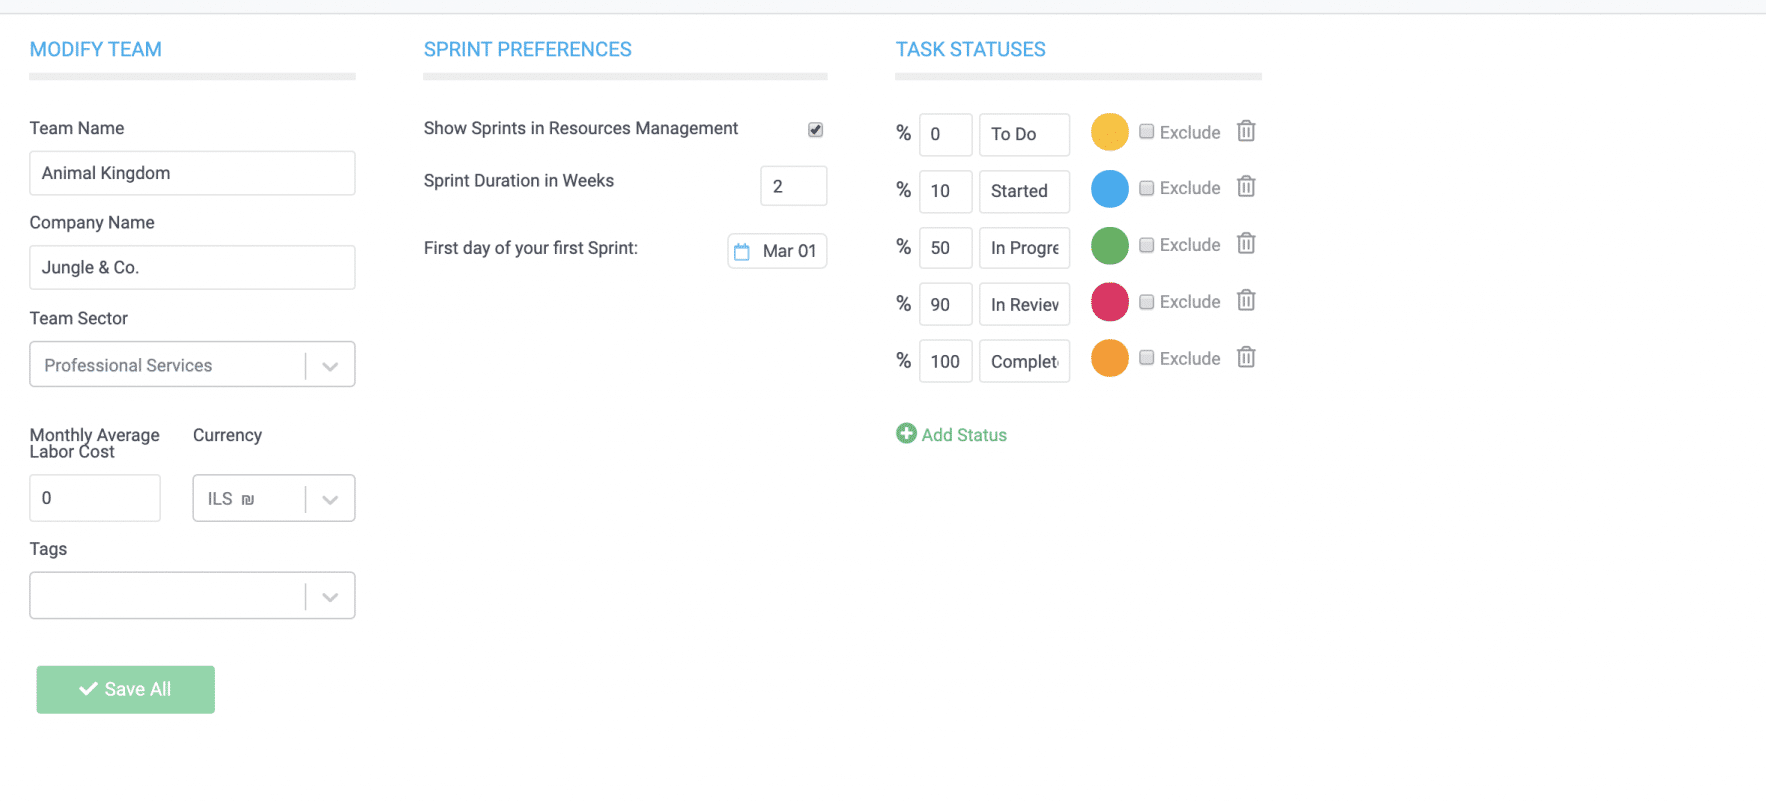
Monthly average labor costs can be used to track project budget. You can read more about it here.
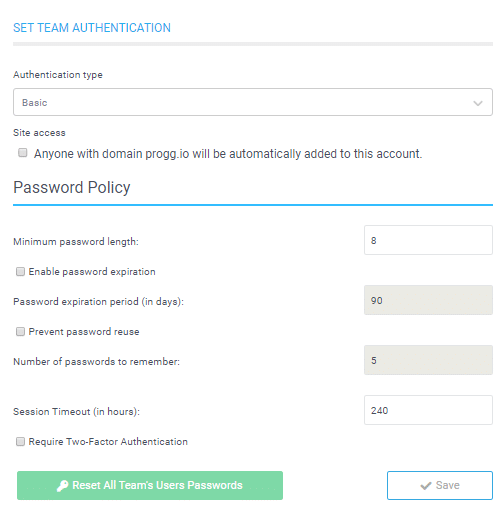
Auth Settings: Password management, SSO setup or choose a two-factor authentication.
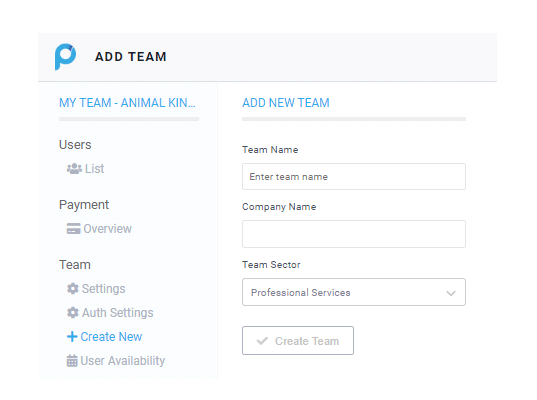
Create New: Creates a new team
Choose to create a new team. By default, new teams are created in Trial mode. To add a new team under an existing subscription, please contact [email protected].
Are you a seasoned Project Manager?
Learn more about Project Management here