Resource management is one of the most significant challenge in project management, if not the most challenging one. Project scheduling and task assignment to different people must be followed by resources analysis, otherwise organizations can easily over-commit and provide false delivery projections to management and customers.
Handling resources consist of at least 3 steps:
- Listing resources with their unique characters, capacity, skills and availability
- Assign activities and tasks to resources while realizing their existing loading in real time and assess their remaining capacity
- Track resources loading over time to manage changes and go through resources leveling process – work balance between different resources and avoid overloading
Proggio supports these 3 steps with different views and actions, assimilating into the way organizations are assigning and managing their resources. As always, Proggio visualize things as a way to create better control. Lets see how it works.
Step 1 – resource listing
Users can be added to Proggio through Settings > Users > List page.
Invite can be sent immediately by adding the user email, or can be sent later if only the user title is added to the invitation:

Click Invite will send an invitation to the user mail.

Click invite will not send invitation, but will add a user title to the list.
As soon as a new resource is added, the team owner can set the user role, skill tag, picture and name by clicking the setting icon in the resources line.
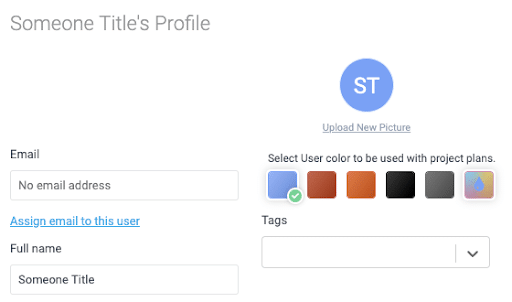
A skill tag is important and can be used later to filter users of this kind.
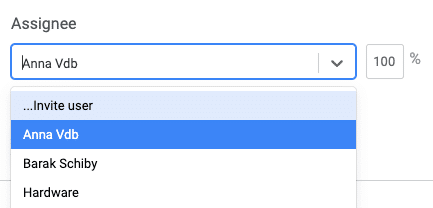
Another option to invite new users is directly from the assignee drop down list in any activity or task. If the resource name is not there yet, click “… invite user” and the invitation window will popup.
Step 2 – Activity and task assignment
Now that you have resources listed correctly, you can go ahead and assign users to activities and tasks from the drop down list. Select an activity and click the task icon to see assignment options for activity containers and tasks.
A resource can be assigned with 100% for the duration of the task (see above), or can get any partial assignment between 0% to 100%. For example, a person looking after a production process of external vendor can assign only 5% of the time for it over a month, implying that he/she can oversee 20 different production processes before being overloaded.
As with real organizations, Proggio keeps a hierarchy of ownership. When a project is created, the project manager is assigned to all new tasks by default. The project manager can change the workstream assignment and then new activities will be assigned to the workstream owner. Same when assignment is change for Activity, new tasks within this activity are getting the activity owner name.
- Project owner
- Workstream owner
- Activity owner
- Task owner
- Checklist owner (same as task)
A team member can own a task with 100% of his time, where another member is holding the activity container but only with 10% of his time (i.e. looking after 10 similar activities at the same time).
NOTE: Proggio resource analysis is only calculated for Activity and Task assignment.
Assignees will be notified about their upcoming tasks using the Proggio-Bot reports:
- 3 days ahead of time: “A task is assigned to you and about to start”
- After start date: “A task started 2 days ago and no progress reported”
- With any change if the “Watch” option was selected on right click
Assignees can review their task list and report progress directly from the project diagram, or using the task management view, from Proggio web-app or with a mobile app.
Step 3 – Resources Leveling
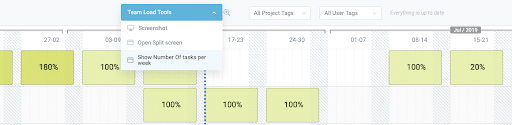
As soon as the resources listing and the basic assignment are done, it’s time to track user loading and take actions. This activity is done with the Team Loading view from the main menu.
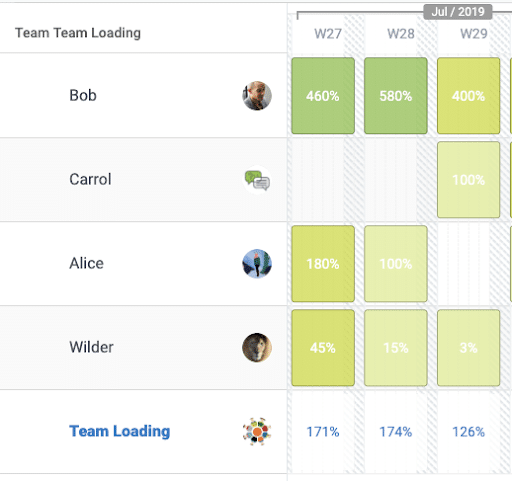
In this view, each line is a resource and the blocks represent a resource loading for a specific week. The existing loading can be viewed in percentage loading (where 100% represent a fully loaded resource) or with number of tasks per week (toggle to this option with the menu on the top).
The view has 2 main filter options, based on projects or based on user skill tags (see above).
If a user should be removed from the capacity analysis, his skill tag can be filtered out.
Loading calculation when using % per week
Let’s start from the last line – entire team capacity. This is a Sum of all percentage loading of the team members in a specific week.
Calculation:
Sum of all team members loading divided by the number of team members.
In this example, W28 has 580% + 100% + 15% = 695%. Divided by 4 team members we are getting to 174%.
The capacity of every single user in every week is calculated per assigned tasks and partial loading (if lower than 100%, see above).
For example, this IT person is loaded 125% at w25.
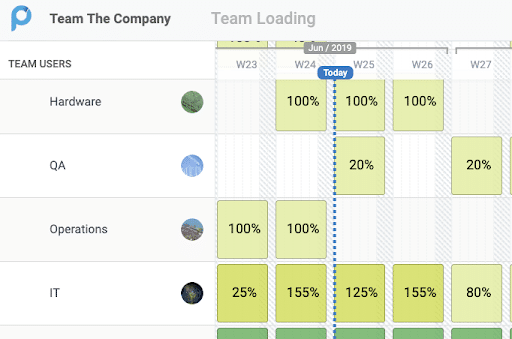
Let’s see why.
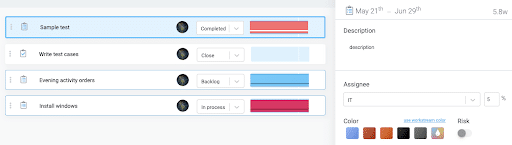
When opening his task board (double click, or with split screen), there are 4 tasks assigned to this week.
“Sample test” has 5 days and 5% loading – taking only 0.25 day of 5 days capacity = 5%
“Write test cases” has 1 day and 100% loading – taking 1 day off 5 days capacity = 20%.
“Finalize activity orders” has 5 days and 50% loading – taking 50% off days this week = 50%.
“Install windows” has 5 days and 50% loading – same, another 50%.
In total – 5% + 20% + 50% + 50% = 125% loading for this week.
NOTE: if the view was set to “Number of tasks per week” as opposed to percentages, the calculation will just count how many tasks are assigned for a given time, ignoring the real loading as implied by the percentages.
Resource leveling
Moving tasks and activities from one resource to the other is very simple, and allow quick resource leveling using the team loading view.
If a resource is too loaded, click the relevant block and look for other users that can carry the same task at the same time. For example, we can move a task from our overloaded IT guy to the Operations guy which is fully available the same week.
Moving a task is done by clicking the user Avatar on the left and selecting the new assignment from the list.
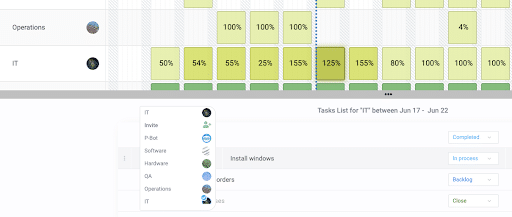
— Before: IT loaded 125%, Operations 0% —

— After: IT loaded by 75%, Operations 50% —
Summary:
In this article we covered resource management with Proggio.
We learned how to list resources, assign activities and tasks and manage overall team loading vs. capacity.
Check other articles and guides on proggio.com/help or reach out to us with any question using [email protected]