Introduction
Dependent Fields allow you to show or hide specific fields based on the selection a user makes in a dropdown (choice) field.
This feature is configured within the workflow settings of your projects or project intake, creating dynamic, intelligent forms that adapt to user input — reducing clutter and improving the user experience.
The power of dependent fields is that you can create multiple workflows that adapt to each user’s selection: Instead of forcing everyone through the same lengthy form, each user sees only the fields relevant to their specific project type, risk level, or other criteria you define.
How It Works
Let’s say you have a choice field called “Project Type” and you only want users who select a certain type – for example, “Product Development”- to be able to fill another field called “Technical Requirements.”
Users who select any other project type, like “Marketing Campaign” or “Infrastructure Upgrade,” won’t see the Technical Requirements field at all.
In this tutorial, we’ll guide you through how to set it up in your space.
How to Configure Dependent Fields
⠀
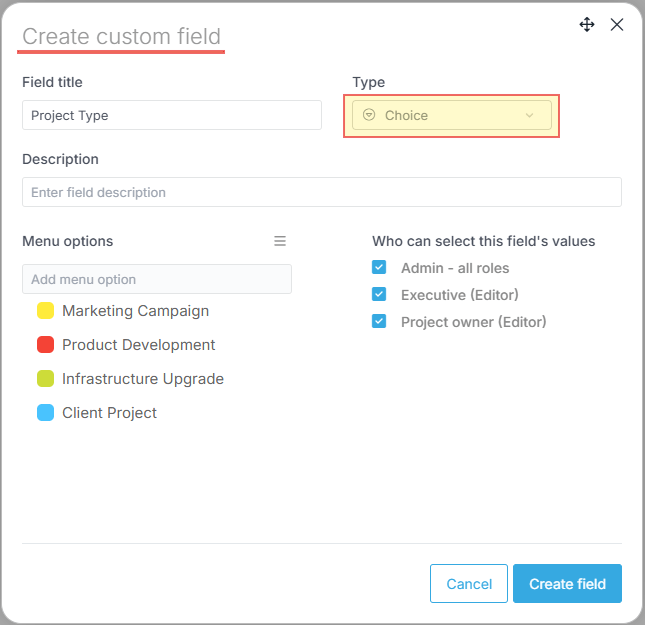
1. Check Your Custom Fields
Need help creating custom fields? See our guide: Adding Custom Fields to Your Space
Ensure you have a Choice type custom field with your desired options already created in your space.
For example, a “Project Type” dropdown with options: Marketing Campaign, Product Development, Infrastructure Upgrade, Client Project
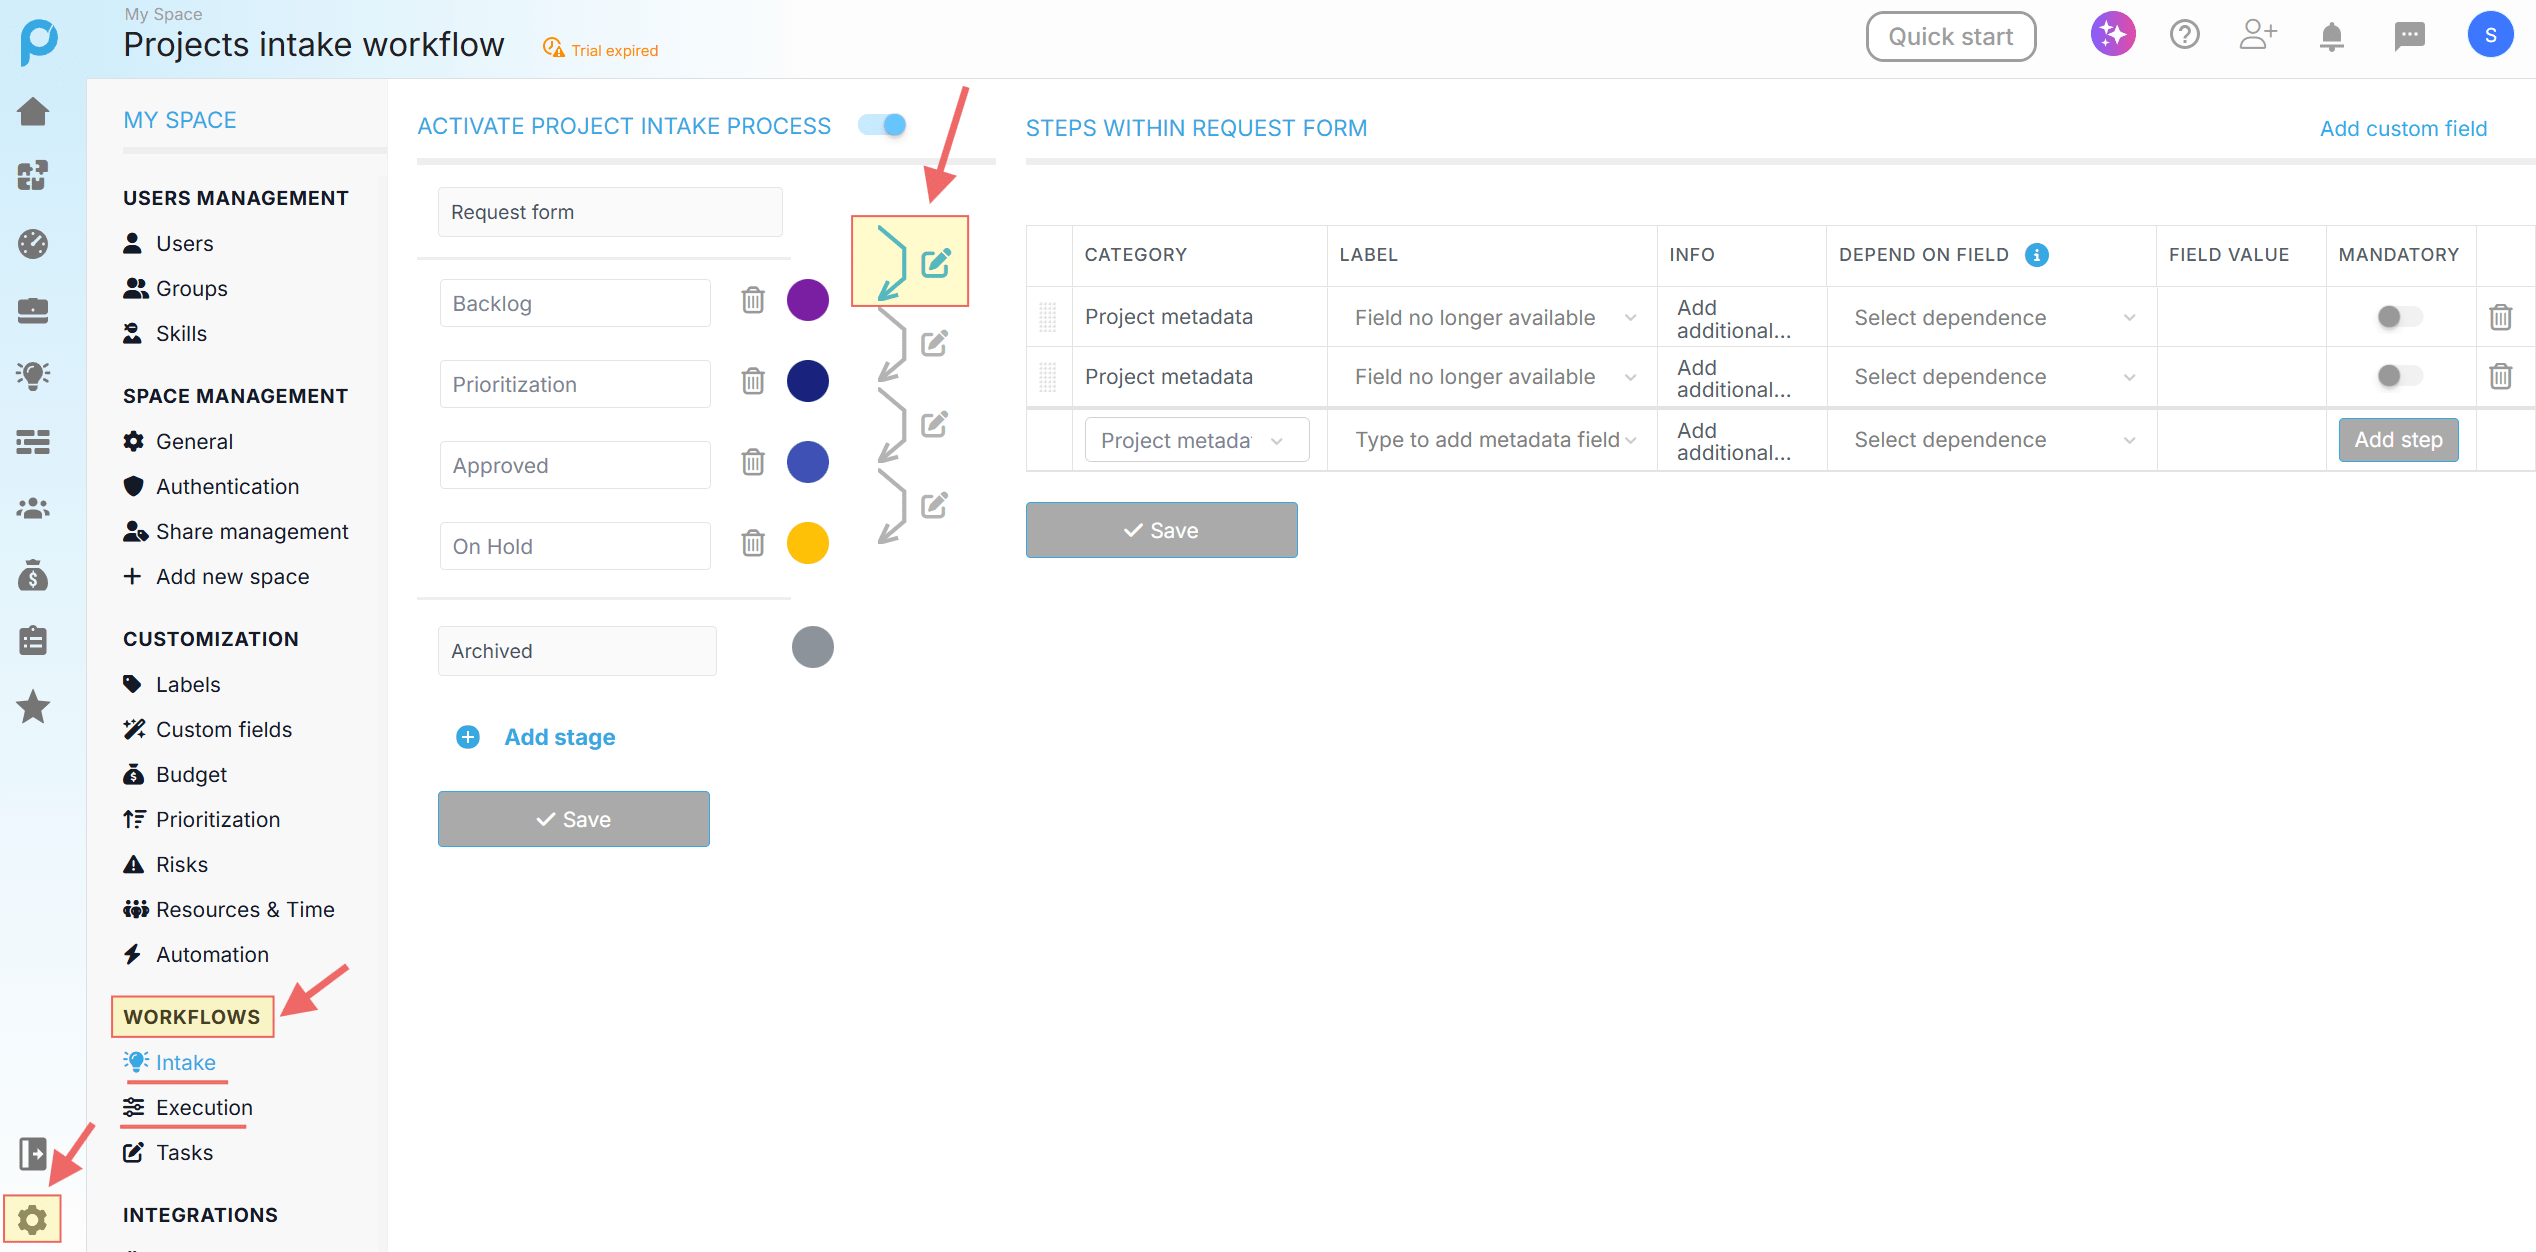
2. Navigate to Workflows
Need help setting up workflow stages? See our guide: Project Workflow
First, go to Settings → Workflows and select either:
- Intake (for project intake request forms)
- Execution (for project execution workflows)
Then choose the relevant stage where you want to configure the dependent field.
For this demonstration, we’ll configure the first stage of the Intake Workflow.
Important: These workflows control the forms and fields that appear when creating or managing projects and project intake requests in Proggio.
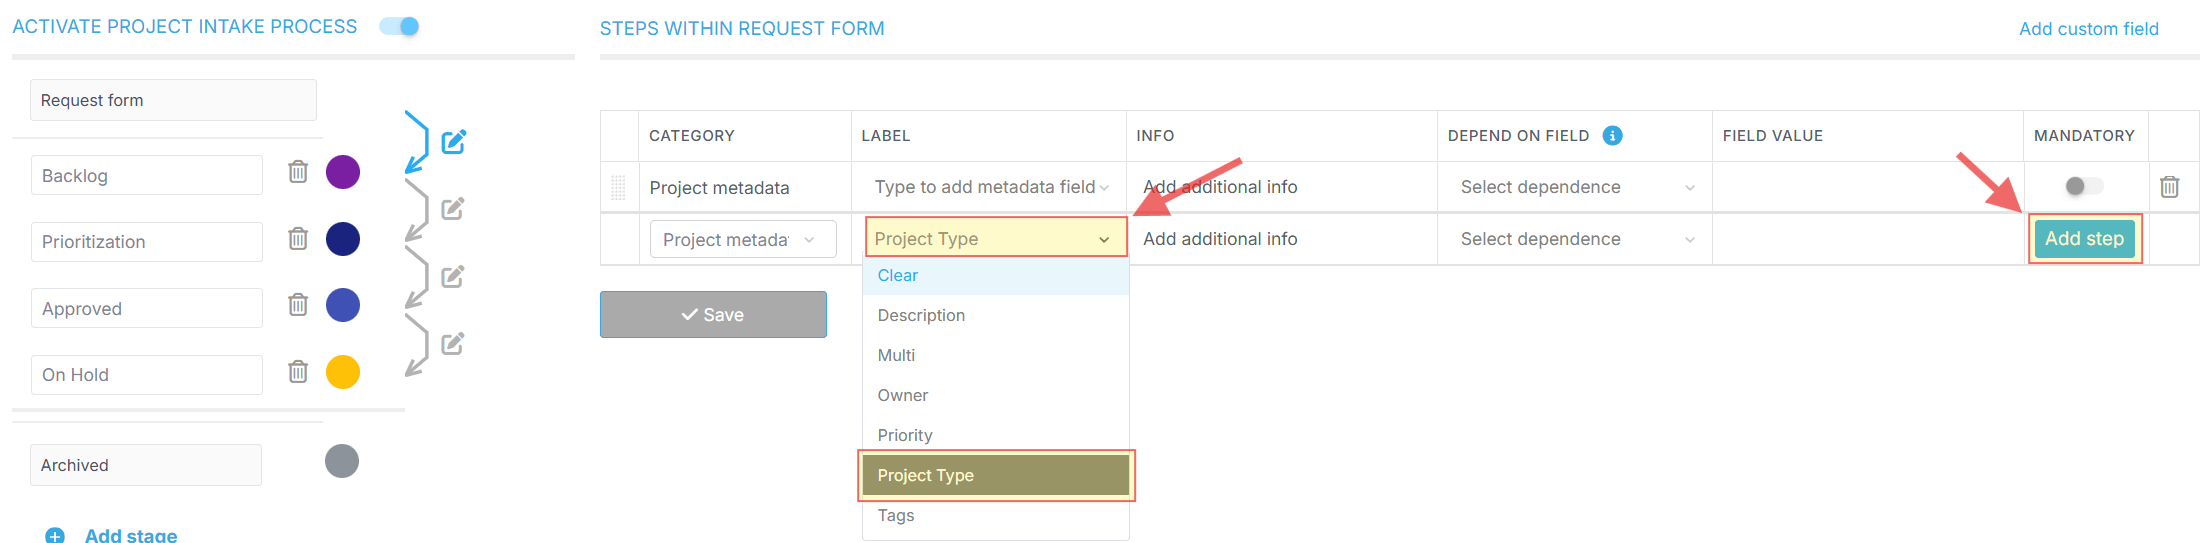
3. Add the Choice Field
Next, add your custom choice field to the steps within the request form on the right-hand side.
The field will appear under the Project metadata category.
After that, click the Add step button on the right.
Note: Any field you add to the workflow steps will be shown in the form by default. Only fields with dependencies configured will appear or disappear based on user selections.
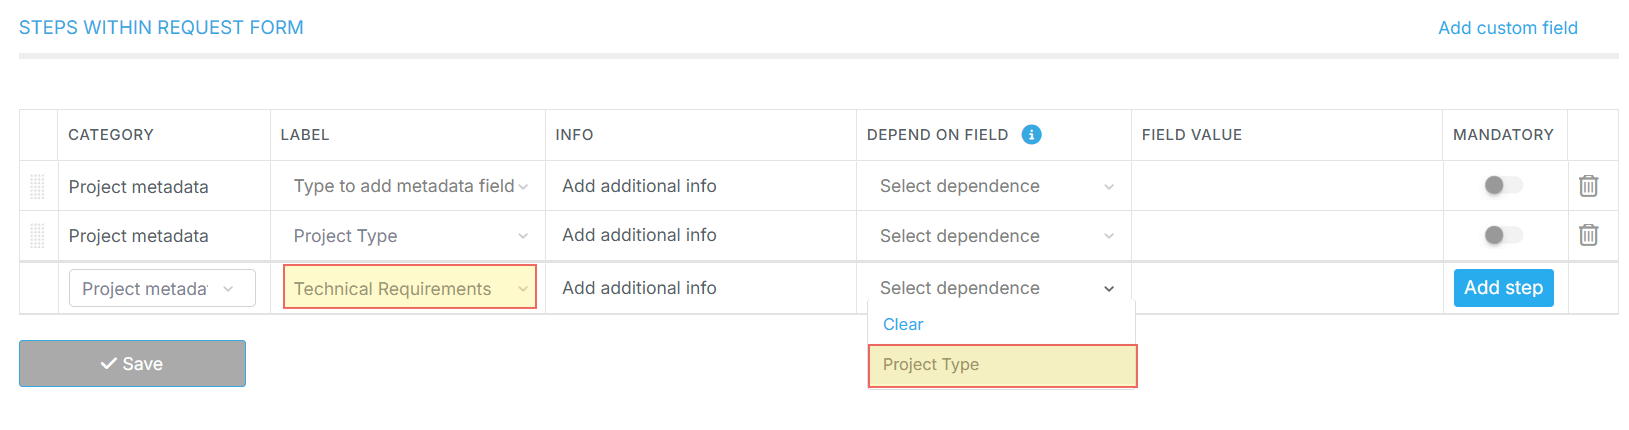
4. Set the Dependency
Now, add the field you want to be hidden or revealed (the “dependent field”).
Then, in the Depend on field column, select your custom choice field from step 3.
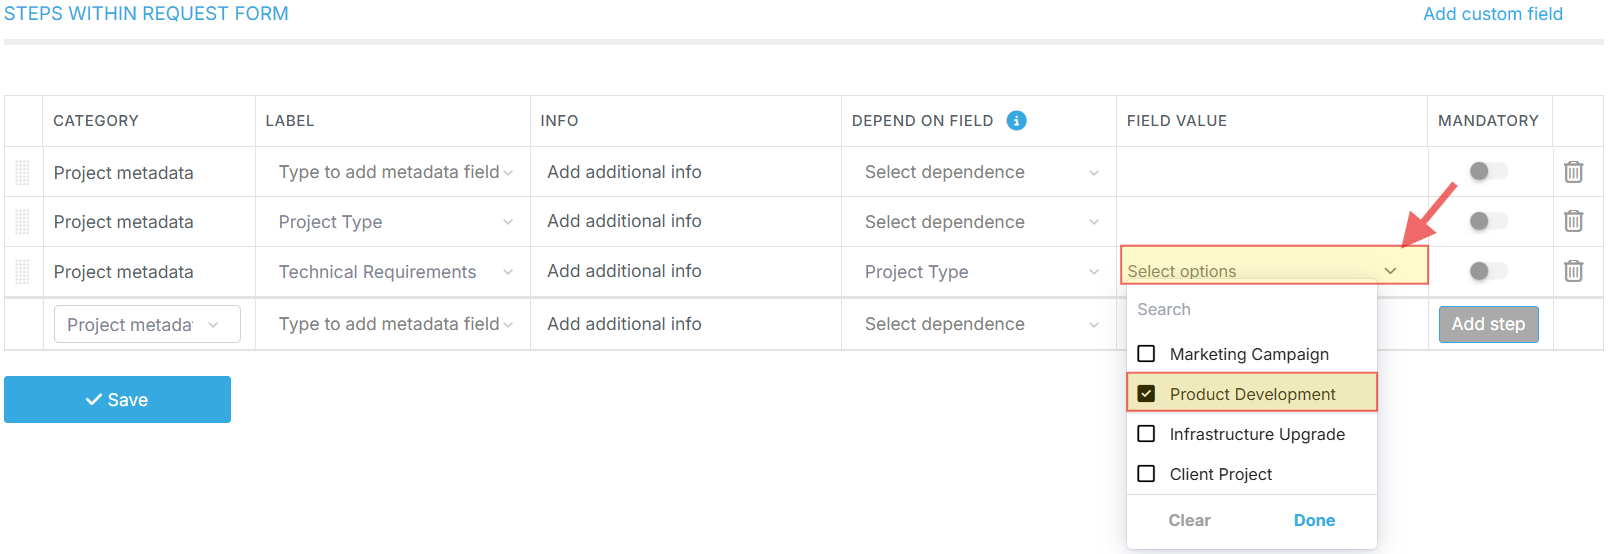
5. Select the Trigger Value
Next, in the Field value column, choose the specific option(s) that must be selected to make this field visible.
Important: You can select multiple values as triggers. For example, if you select both “Product Development” and “Client Project” as field values, the dependent field will appear when either of these options is selected.
For example, if you select Field value as “Product Development”, then the dependent field will only appear when a user chooses “Product Development” from the “Project Type” dropdown.
6. Save Your Configuration
Finally, click the Save button, and your configuration is live!

The dependent field relationship is now active in your workflow.
How to Test Your Configuration
We recommend testing your setup before rolling it out to your team.
Important: You need to test in the specific workflow stage where you configured the dependent field.
- If you configured the dependent field in the first stage (creation):
- Go to Projects Intake (for intake workflows) or Portfolio (for execution workflows)
- Click “Create” and select “Add project intake” or “Add project”
- Fill out the form and select the trigger option in your choice field
- Watch the dependent field appear in real-time!
- If you configured the dependent field in a later stage:
- Open an existing project or intake project (or create a new one)
- View it in board (Kanban) mode
- Drag the project to the stage where you configured the dependent field
- A form will appear — select the trigger option in your choice field
- Watch the dependent field appear!

Tip: If you’re testing in a later stage, you may need to move the project through previous stages first, or create a test project specifically for testing this configuration.
Pro Tips
💡Simplify Long Forms with Multiple Dependencies

If you have a long form with many fields -like this 14-field example – you can significantly improve the user experience by using multiple dependent fields.
How it works:
- Not all 14 fields need to be visible at once
- Configure dependencies for fields that are only relevant in specific scenarios
- Users will only see the fields they actually need to fill out
Example: This 14-Field Intake Form
Instead of showing all 14 fields immediately, this form is configured so that:
- 9 core fields appear by default (Project Type, Project Risk, Owner, Priority, Description, Department, Customer, Location, Objectives)
- 2 additional fields appear when “Critical” or “High” is selected for Project Risk (Decisions Made, Escalation)
- 3 additional fields appear when “Infrastructure Upgrade” is selected for Project Type (ROI, Time-to-Market, Risk Exposure)
Result:
- A user creating a simple Marketing Campaign with Low Risk sees only 9 fields
- A user creating an Infrastructure Upgrade with High Risk sees 14 fields (all fields)
- A user creating an Infrastructure Upgrade with Medium Risk sees 12 fields
Users filling out the form won’t be overwhelmed by all 14 fields instantly. They’ll see a streamlined form that adapts to show only the necessary fields based on their selections.
This approach reduces form abandonment, improves data quality, and creates a better overall user experience.
💡Create Custom Workflows for Any Choice Field
You can take dependent fields even further by creating completely different workflows based on any choice field you configure. This means each selection creates an entirely tailored experience.
How it works:
Instead of just hiding a few fields, you can configure your form so that selecting different options reveals completely different sets of fields – creating unique workflows for each scenario.
This works with any choice field – not just Project Type.
You could do this with Project Risk, Department, Request Category, or any other choice field you create.
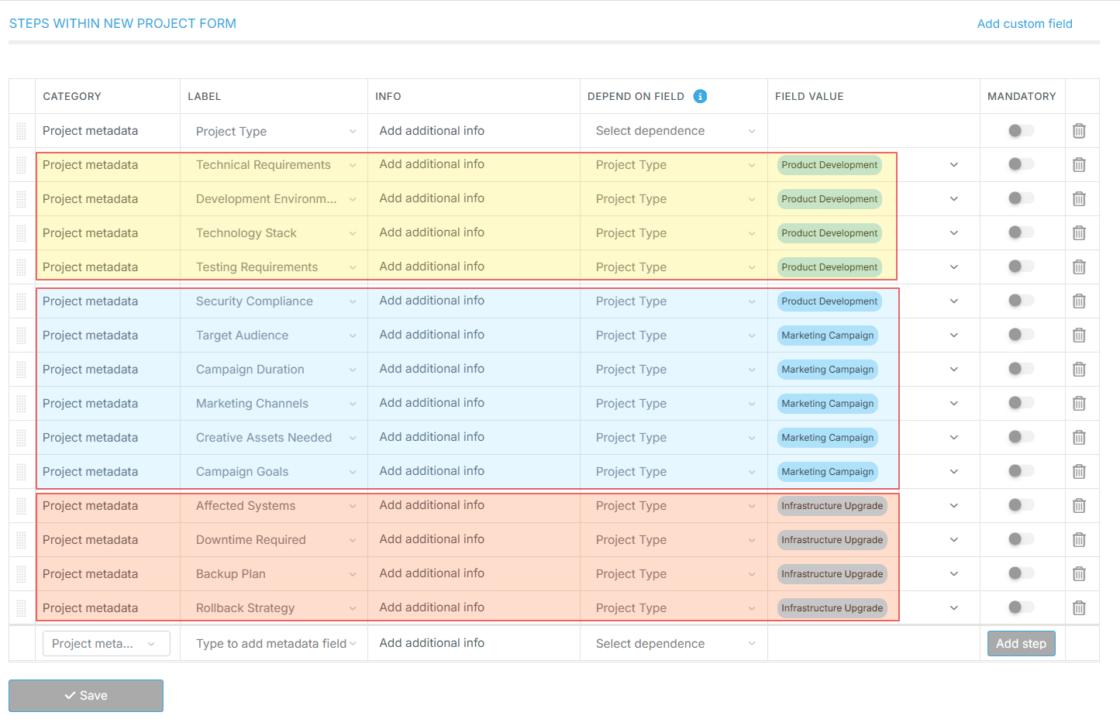
Example 1: Project Type-Specific Workflows
When “Product Development” is selected:
- Technical Requirements
- Development Environment
- Technology Stack
- Testing Requirements
- Security Compliance
When “Marketing Campaign” is selected:
- Target Audience
- Campaign Duration
- Marketing Channels
- Creative Assets Needed
- Campaign Goals
When “Infrastructure Upgrade” is selected:
- Affected Systems
- Downtime Required
- Backup Plan
- Rollback Strategy
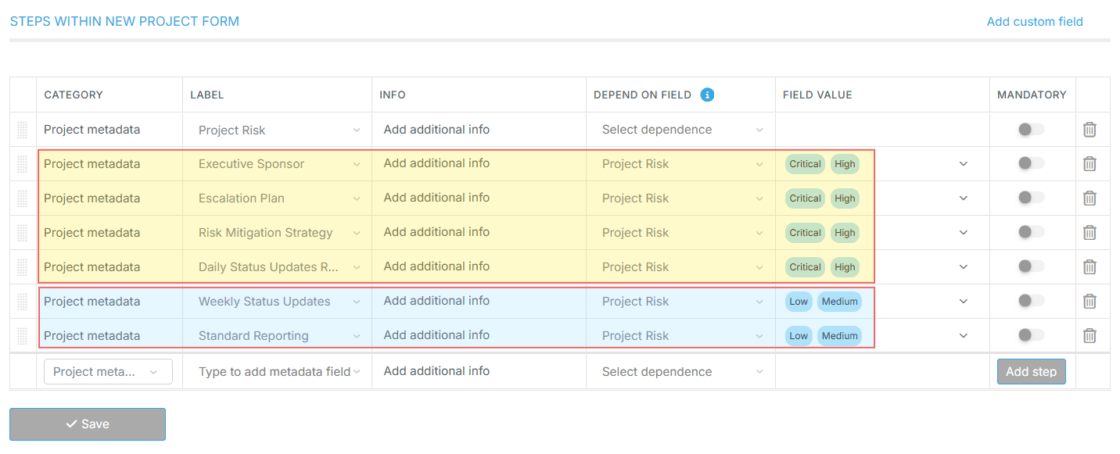
Example 2: Risk Level-Specific Workflows
You could achieve the same effect with a “Project Risk” choice field:
When “High” or “Critical” is selected:
- Executive Sponsor
- Escalation Plan
- Risk Mitigation Strategy
- Daily Status Updates Required
When “Low” or “Medium” is selected:
- Weekly Status Updates
- Standard Reporting
Result: What the user creates will be completely aligned with their selection.
Each option gets its own custom workflow with only the relevant fields – ensuring users never see irrelevant questions and always provide the right information for their specific scenario.
This approach allows you to create endless workflows that adapt to user selection for any choice field you configure, making sure each form experience is perfectly tailored to what the user is actually trying to accomplish.
Use Cases & Examples
Example 1: Budget Field Based on Project Type
Trigger Field: “Project Type” (Options: Small, Medium, Large, Enterprise)
Dependent Field: “Budget” (appears only when “Large” or “Enterprise” is selected)
Result: Budget field only shows for large-scale projects, keeping the form clean for smaller initiatives.
Example 2: Technical Details Based on Request Category
Trigger Field: “Request Category” (Options: Bug Fix, Feature Request, Enhancement, Other)
Dependent Field: “Technical Specifications” (appears only when “Feature Request” or “Enhancement” is selected)
Result: Technical details are only requested when relevant, streamlining bug fix submissions.
Example 3: Approval Required Based on Risk Level
Trigger Field: “Risk Level” (Options: Low, Medium, High, Critical)
Dependent Field: “Executive Approval Required” (appears when “High” or “Critical” is selected)
Result: Approval fields only appear for high-risk projects, reducing friction for low-risk work.