What Is Proggio?
Getting started with Proggio is simple, and within minutes you’ll have access to a powerful project portfolio management platform that helps teams plan, track, and deliver projects with clarity.
Using the visual ProjectMap™ timeline, you can organize work across workstreams, set milestones, manage dependencies, and keep everyone aligned—from high-level strategy to daily task execution.
Additionally, Proggio combines powerful AI assistance with intuitive manual controls, letting you build project plans quickly and refine them with precision.
With Proggio, you can:
- Plan and prioritize — Manage project milestones, distribute assignments, and highlight what needs attention: overdue, delayed, active, or upcoming work across all projects.
- Track progress — Give managers and team members easy visibility into status and next steps for any project or task.
- Communicate in context — Facilitate updates and discussions between everyone in your workspace, keeping conversations tied to the work they relate to.
Signing Up for Proggio
Getting started with Proggio takes just a few steps:
- Visit app.proggio.com/signup and enter your business email.
- Click Get Started.
- Complete your profile details and click Get Started again.
- Check your email for a confirmation link and click to verify.

Once confirmed, you’ll be guided through the Project Creation Wizard to set up your first project.
Creating Your First Project in Proggio
Proggio offers several ways to create your first project.
Therefore, you can choose the method that best fits your workflow.
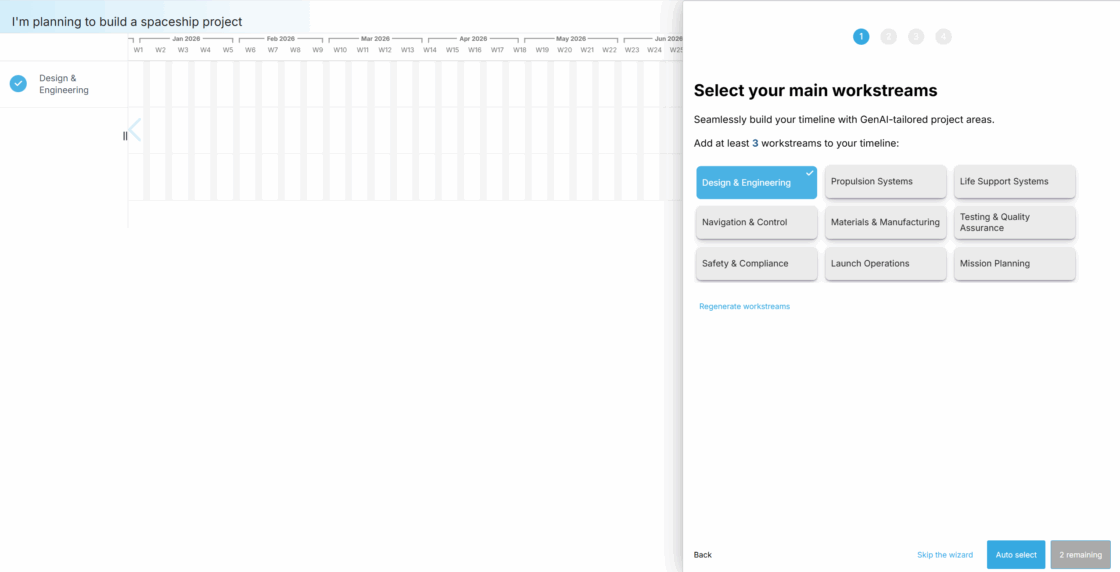
Option 1: Generate with AI (Recommended)
Let TimelineGPT build your project structure automatically:
- Click the puzzle icon in the left navigation panel to open the Timeline Builder.
![]()
- Describe your project goal or purpose (e.g., “Create a website redesign project with design, development, and testing phases”).
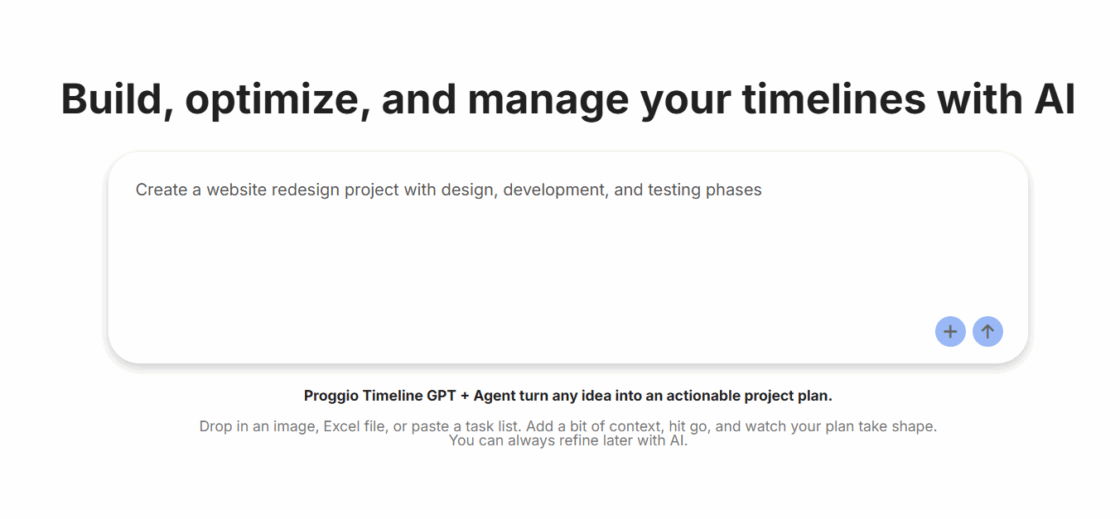
- Optionally, attach supporting files — drop in an image, Excel file, or paste a task list for additional context.
- Hit go
 and watch your plan take shape.
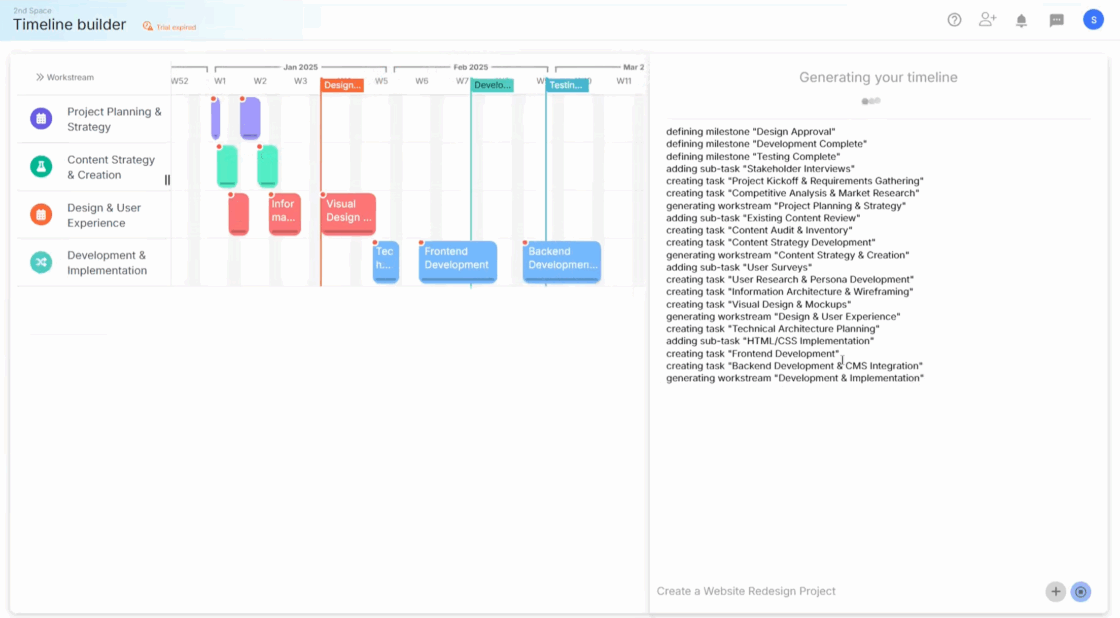
- Review and refine the AI-generated plan as needed.
Proggio Timeline GPT + Agent turns any idea into an actionable project plan. You can always refine later with AI.
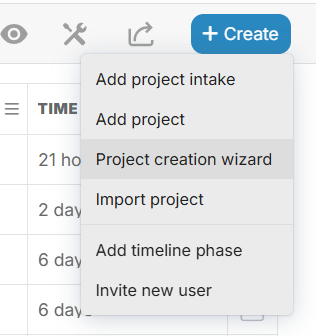
Option 2: Project Creation Wizard
For a guided step-by-step setup:
- Click + Create → Project creation wizard.
- Follow the prompts to define your project details, timeline, and structure.
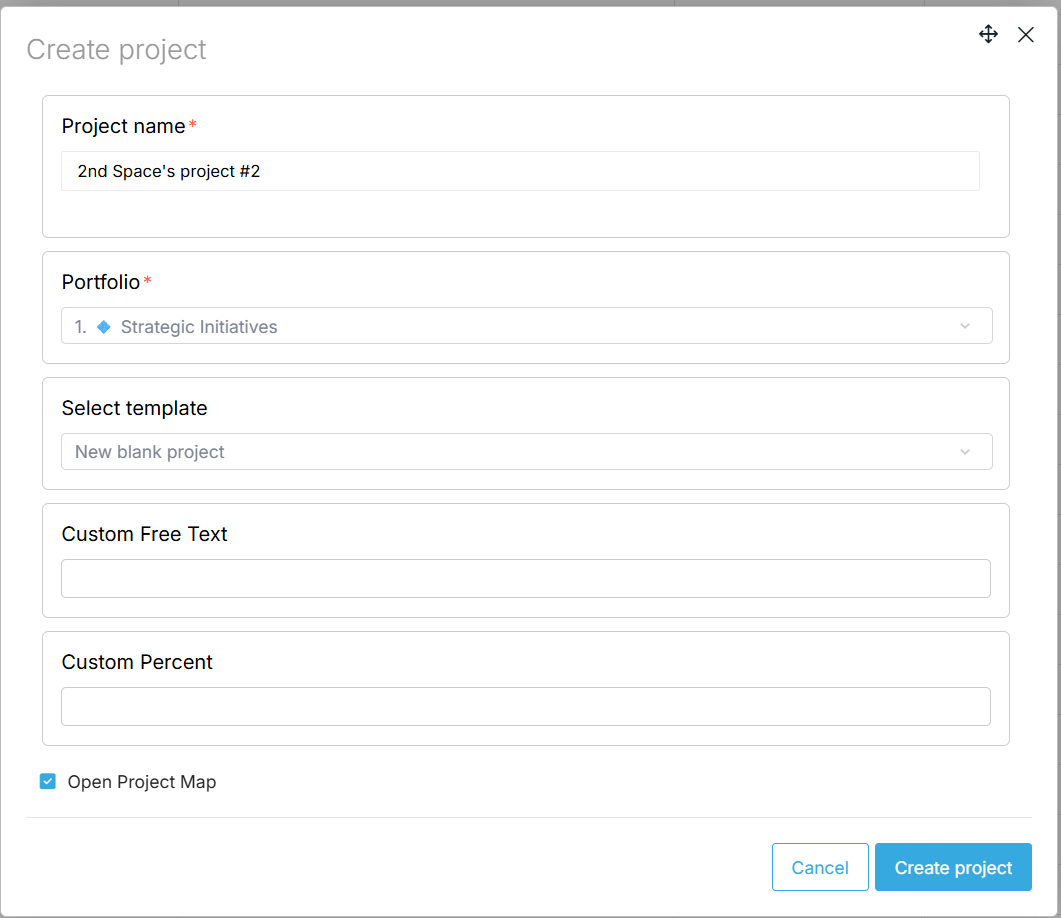
Option 3: Start from Scratch
If you prefer to build your project manually:
- Click + Create → Add project.
- Enter your project details and click Create project.
- Add workstreams, tasks, and milestones using the + Create menu or by clicking directly on the timeline.
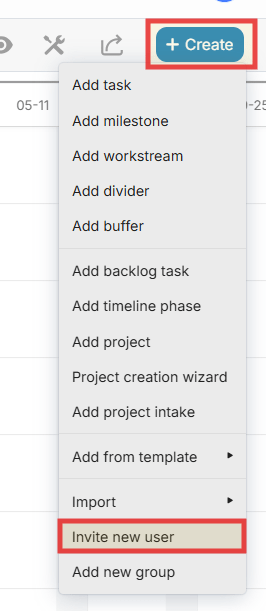
The + Create menu gives you quick access to add:
- Tasks, Milestones, Workstreams, Dividers, Buffers
- Backlog tasks and Timeline phases
- Projects and Project intakes
- Items from templates or via Import
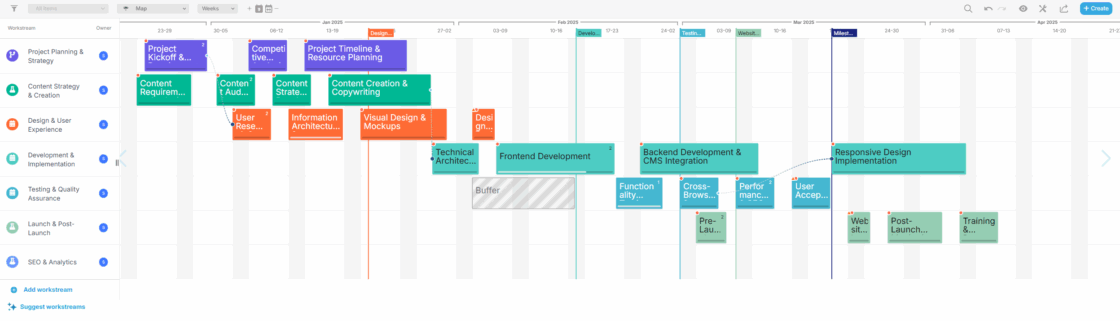
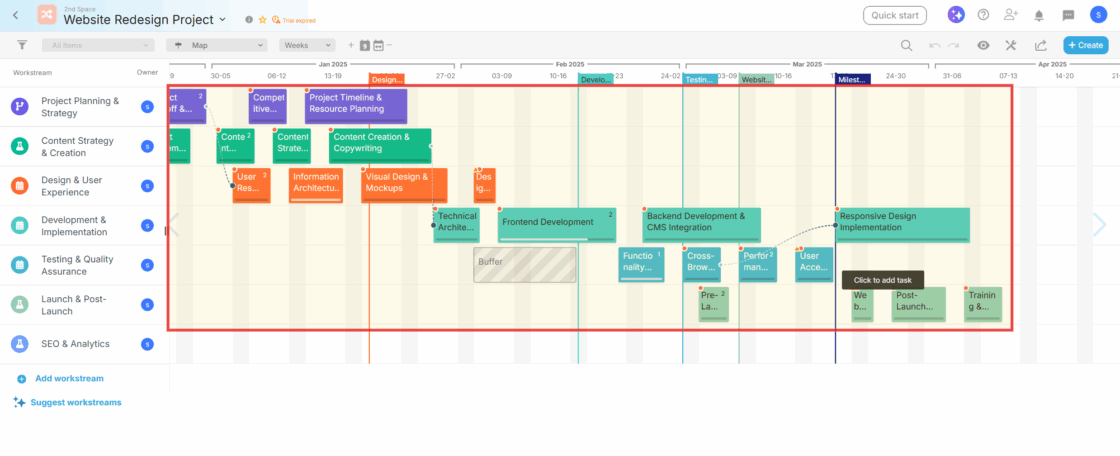
Your project opens in the ProjectMap™ timeline view—the foundation for planning and managing your work.
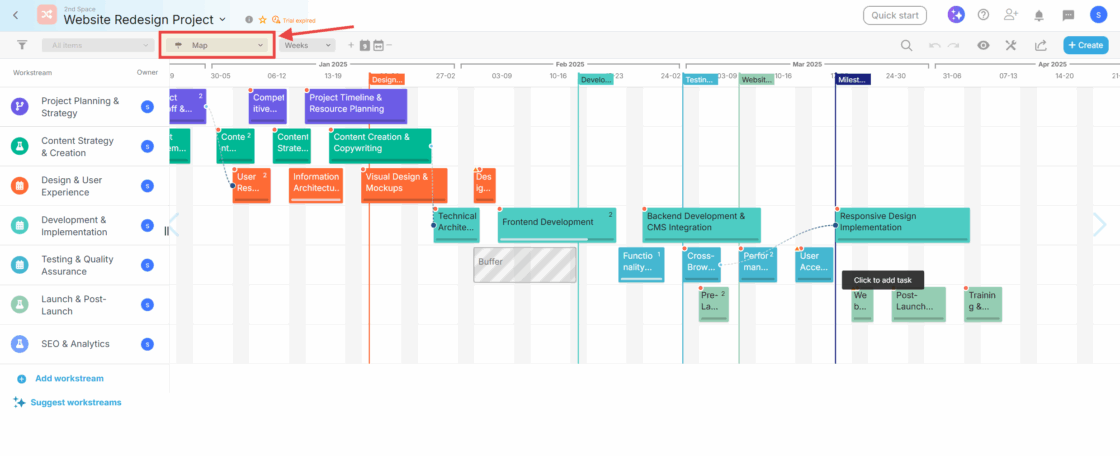
Navigating the Proggio ProjectMap™
The ProjectMap™ is your visual project timeline.
Here’s how to navigate it effectively:
Adjusting the View
- Zoom in/out: Hover over the date row and scroll with your mouse wheel, or use the timeframe dropdown (Days / Weeks / Months / Quarters)
- Move around: Click and drag anywhere on the canvas to pan left, right, up, or down
- Jump to today: Click the calendar icon
 in the top left toolbar
 - View full project: Click the expand icon
 to fit the entire project on screen
Toolbar
The toolbar is split into two areas.
On the bottom side, you’ll find project-specific tools:
| Icon | Name | Function |
|---|---|---|
| Search Task | Find tasks or milestones by name | |
 | Undo/Redo | Undo or redo recent actions |
| Eye Icon | View/display options | |
| Tools (Wrench) | Project tools: Automation, AI chat, Workflows, JIRA sync, and more | |
| Share Icon | Share, Screenshot, or Export your project | |
 | + Create | Add tasks, milestones, workstreams, buffers, projects, and more |
On the top side of the toolbar, you’ll find workspace-level tools:
| Icon | Name | Function |
|---|---|---|
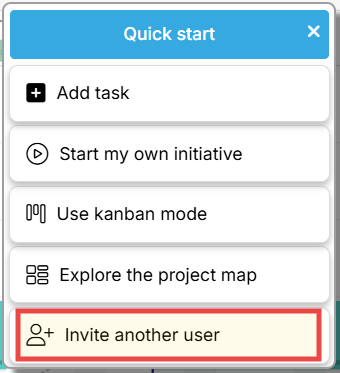
 | Quick Start | Guided actions: Add task, Start initiative, Use Kanban, Explore map, Invite user |
| Proggio AI | Access AI assistance | |
| Help | In-app guides, Help center, Project creation wizard, Ask Proggio.AI | |
| Add User | Invite new users to your workspace | |
| Notifications | Project notifications — changes, updates, alerts | |
| Message Center | Messages and @mentions from your team | |
| Profile Avatar | Your user profile and settings |
Understanding the Proggio ProjectMap™ Structure
When getting started with Proggio, it’s important to understand the key elements that make up your project timeline.
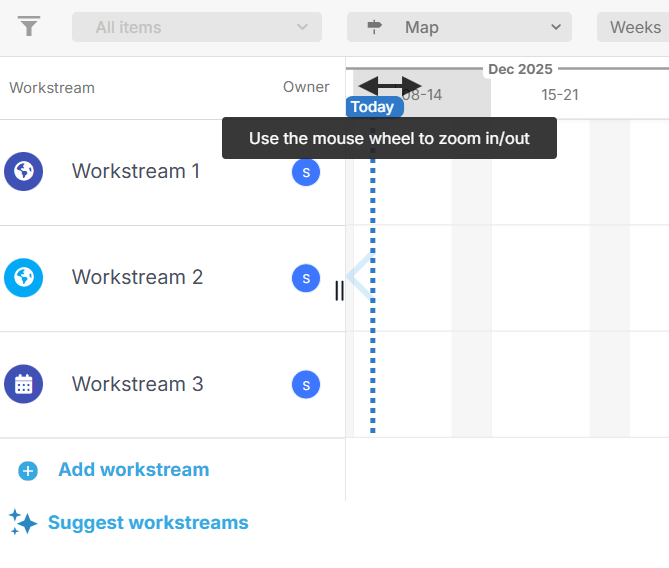
Workstreams
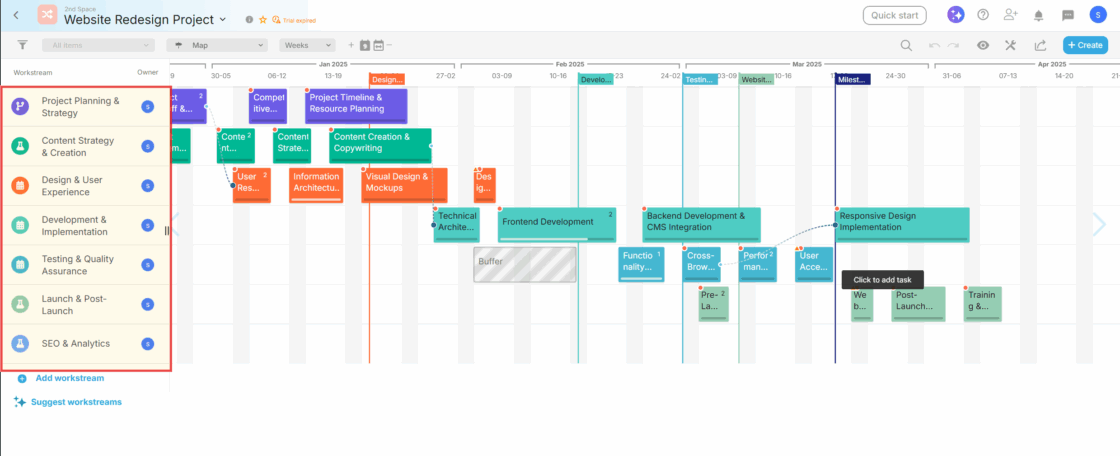
Workstreams are the horizontal rows that organize your project by team, department, or phase. In other words, think of them as the major areas of work in your project.
To add a workstream:
- Click + Add workstream at the bottom of the workstream list
- Alternatively, click ✨ Suggest workstreams to let AI recommend workstreams based on your project
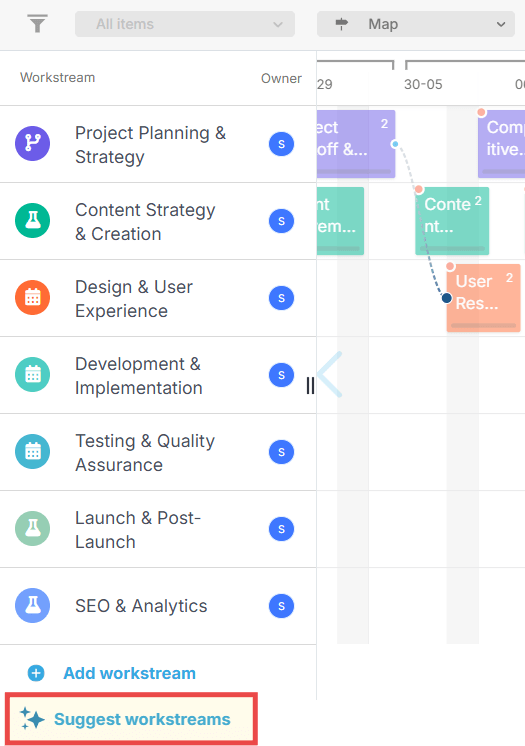
Best Practice: Keep workstreams broad (e.g., “Engineering,” “Design,” “Marketing”) rather than naming them after individuals. This keeps your timeline clean and tracks ownership by team.
Tasks
Tasks are the colored blocks on your timeline.
Each task represents a piece of work, and its length shows its duration.
To add a task:
- Hover over an empty area on the timeline and click + Add Task
- You can also click the ✨ stars icon to generate tasks with AI
To edit a task:
- Click once on a task to open the split-screen panel below, where you can edit the name, dates, assignee, and other details
- Drag the left or right edge of a task to change its duration
- Similarly, drag the entire task to move it to a different date
Subtasks
Subtasks are the to-do items within a task. When you click a task, the split-screen shows its subtasks.
To add subtasks:
- First, click a task to open the split-screen
- Then, click + Add sub-task or ✨ Generate AI sub-tasks in the split-screen area
Pro Tip: If an item is crucial to your project’s structure, create it as a task on the timeline. If it’s a to-do item that helps complete a task, keep it as a subtask.
Milestones

Milestones mark key dates or achievements in your project—for example, “Launch Date” or “Design Review Complete.”
To add a milestone:
- Double-click anywhere on the date row at the top of the timeline
- Next, click the milestone flag to rename or change its color
Dependencies
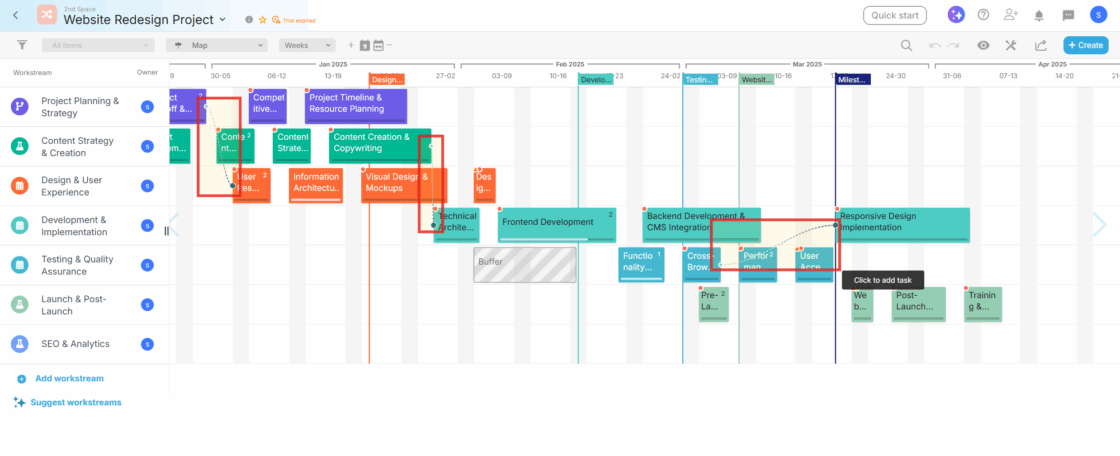
Dependencies link tasks together so that when one moves, connected tasks move with it. This keeps your project timeline synchronized.
To create a dependency:
- Hover over a task to reveal the blue dependency connector (horseshoe shape)
- Click and drag from one task’s connector to another task or milestone
Buffers
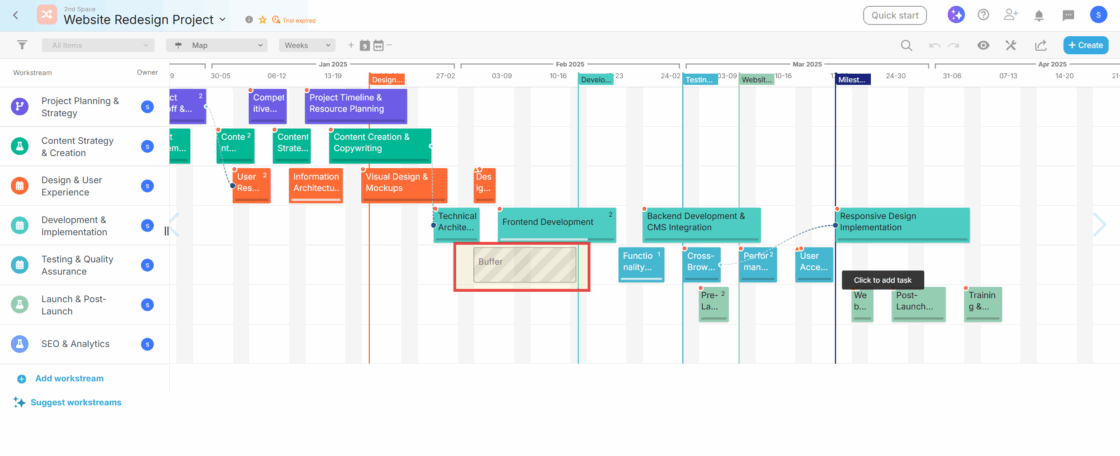
Buffers represent slack time between dependent tasks. They appear as gray striped blocks and automatically adjust when you move connected tasks.
To add a buffer:
- Click + Create → Add buffer, then place it on the timeline
- Alternatively, right-click a task (that has no subtasks) and select Convert to buffer
Managing Tasks in Proggio
Proggio offers multiple views for managing tasks, each suited to different workflows.
Below is an overview of each option.
Timeline View (ProjectMap™)
This is the default view for planning and seeing tasks in context.
To edit any task, simply click on it to open the split-screen for quick edits.
Board View (Kanban)
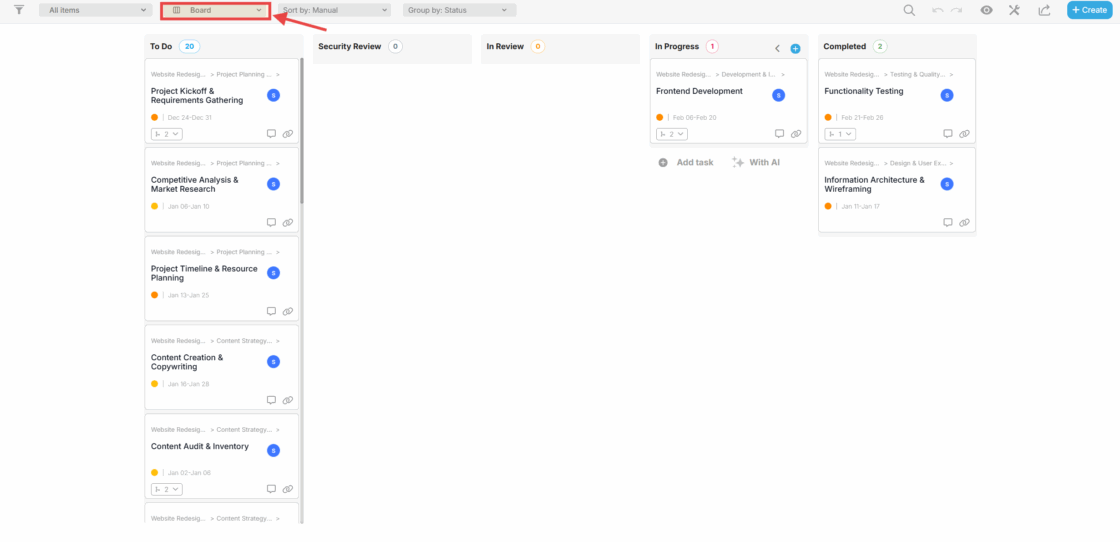
The Board View provides a card-based interface for tracking task status.
Here, you can drag and drop tasks between columns (e.g., To Do → In Progress → Done).
To access this view, click the view dropdown (top-left) and select Board.
List View (Spreadsheet)

The List View offers a table format for scanning and bulk-editing tasks.
Moreover, you can customize columns, sort, and filter to focus on what matters most.
To access this view, click the view dropdown and select List.
Backlog Tasks
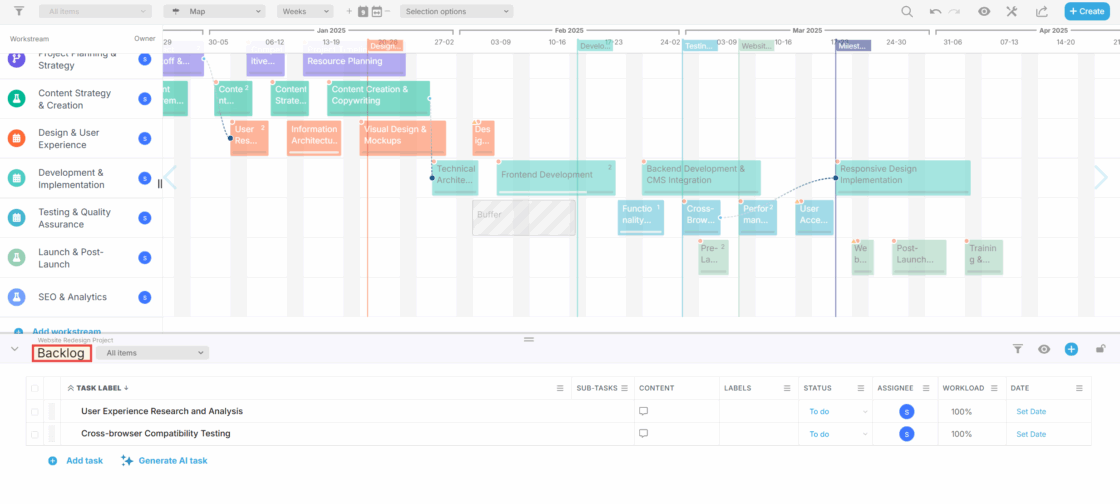
Backlog tasks are items you want to track but haven’t scheduled yet.
Because they’re unscheduled, they don’t appear on the timeline until you’re ready to plan them.
To add a backlog task, click + Create → Add Backlog Task.
Then, enter the task name in the split-screen and click Save.
To schedule a backlog task, first open the split-screen backlog list.
Next, drag a task from the backlog onto a workstream on the timeline.
For more details, see: Managing Backlog Tasks Effectively
Using AI Assistance in Proggio
Proggio’s AI features help you build and optimize projects faster. Here’s how to leverage these powerful capabilities when getting started with Proggio.
Proggio.AI Features
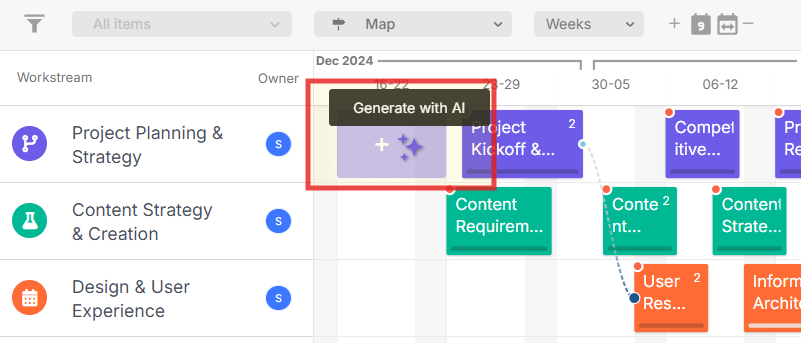
The AI assistant offers several ways to speed up your workflow. To suggest workstreams, click ✨ Suggest workstreams at the bottom of the workstream list.
To generate tasks, hover over a workstream, click ✨, and select Generate with AI.
Similarly, to generate subtasks, open the split-screen and click ✨ Generate AI sub-tasks.

TimelineGPT Chat
For broader changes to your plan, use the AI chat interface. For instance, you can ask TimelineGPT to:
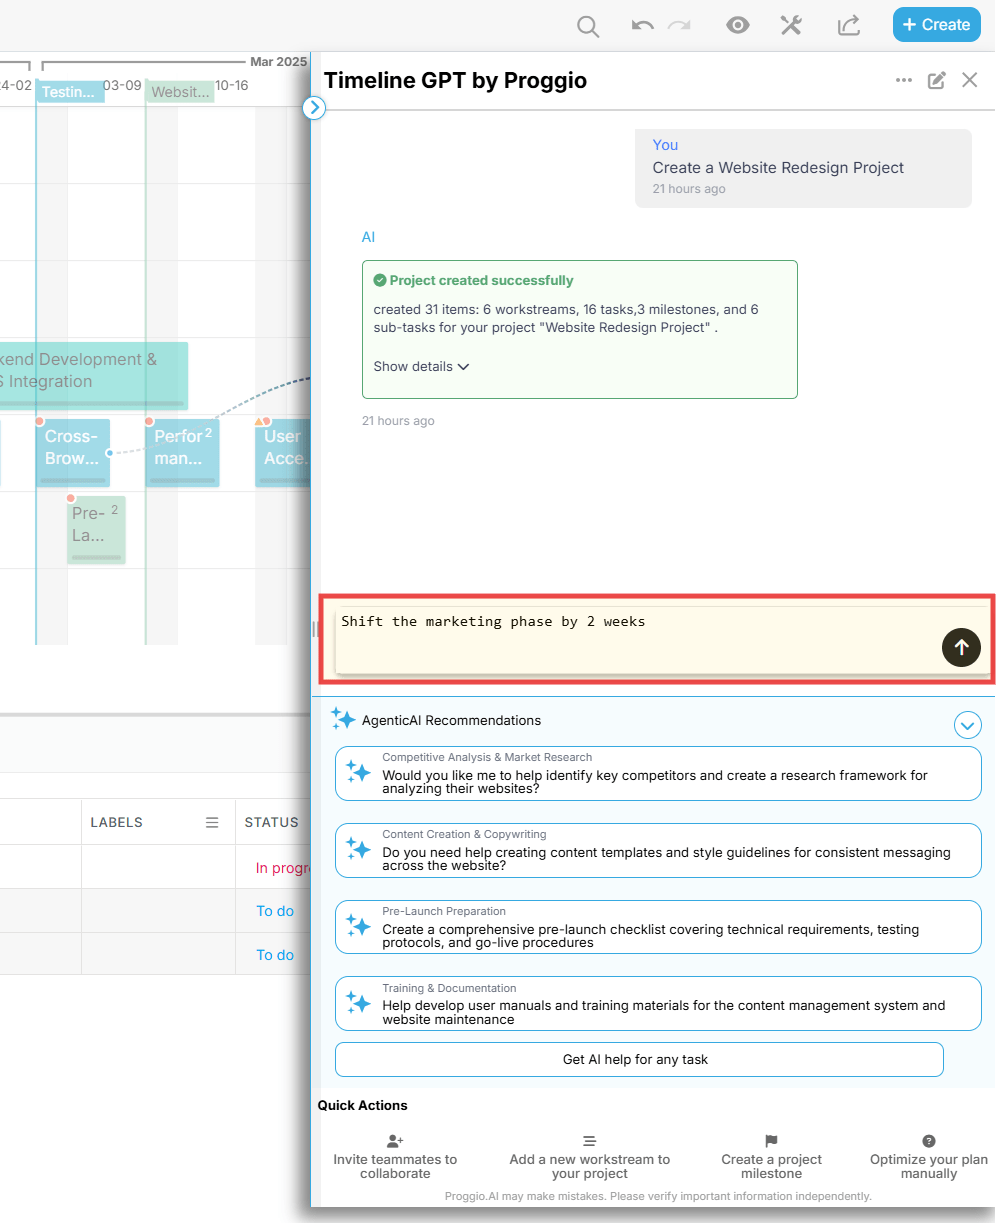
- “Shift the marketing phase by 2 weeks”
- “Add a QA testing phase before launch”
- “What dependencies might be at risk?”
To access TimelineGPT, click the Tools icon (wrench) → Open AI chat. Alternatively, click Help (?) → Ask Proggio.AI, or use the ✨ Proggio AI button in the top-right corner.
For TimelineGPT details, see: TimelineGPT: Your AI Partner for Project Fulfillment
AgenticAI Recommendations
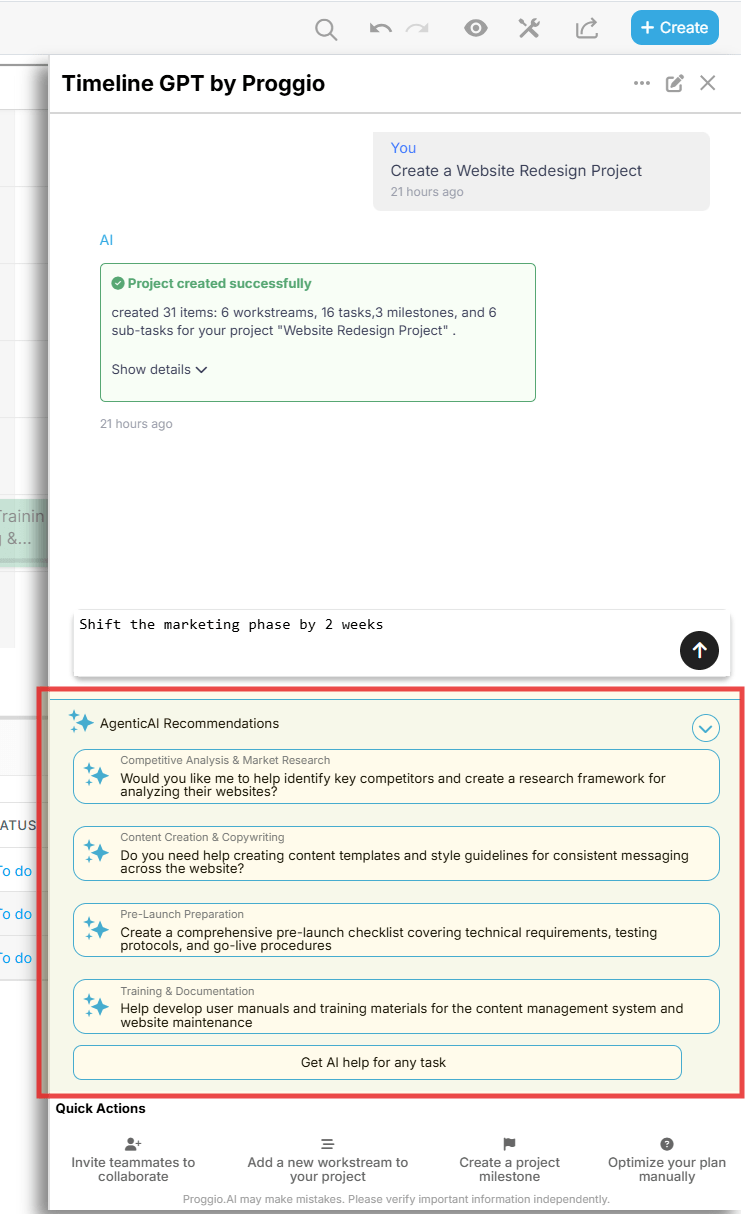
Beyond timeline generation, Proggio’s AgenticAI actively assists with project execution.
Once you create a project, the AI analyzes your tasks and surfaces intelligent recommendations based on your project’s current state.
To access AgenticAI, click the colored stars ✨ icon in the top-right corner.
A chat panel opens on the right side, displaying suggested actions for your project tasks.
Example recommendations:
- “You haven’t recruited inspectors yet. Would you like help creating a job posting template?”
- “Document distribution finishes after phase 3, but inspections start in phase 2. Should I reschedule?”
- “Sarah is allocated at 150% capacity next week. Would you like me to suggest optimal task reallocation?”
You can also right-click any task and select “Discuss with AI” to get specific help with execution checklists, templates, documentation, and more.
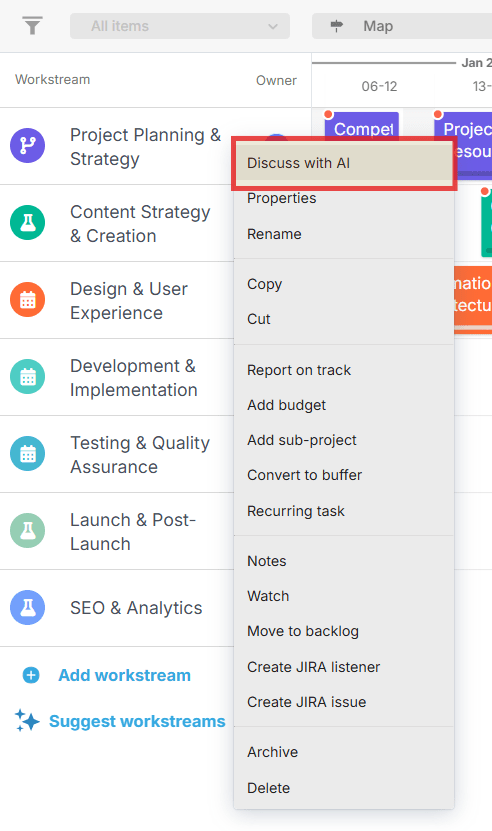
Importantly, all AI discussions are saved with your project, so team members can revisit conversations anytime.
For a detailed guide, see: Proggio’s AgenticAI: AI Recommendations & Execution
Inviting Your Team to Proggio
You can invite team members from any screen in Proggio.
Option 1
Click + Create → Invite new user
Option 2
Click the Add user icon (person with +) in the top-right toolbar
![]()
Option 3
From the Quick start menu, select Invite another user
In the invitation dialog, you have several options available.
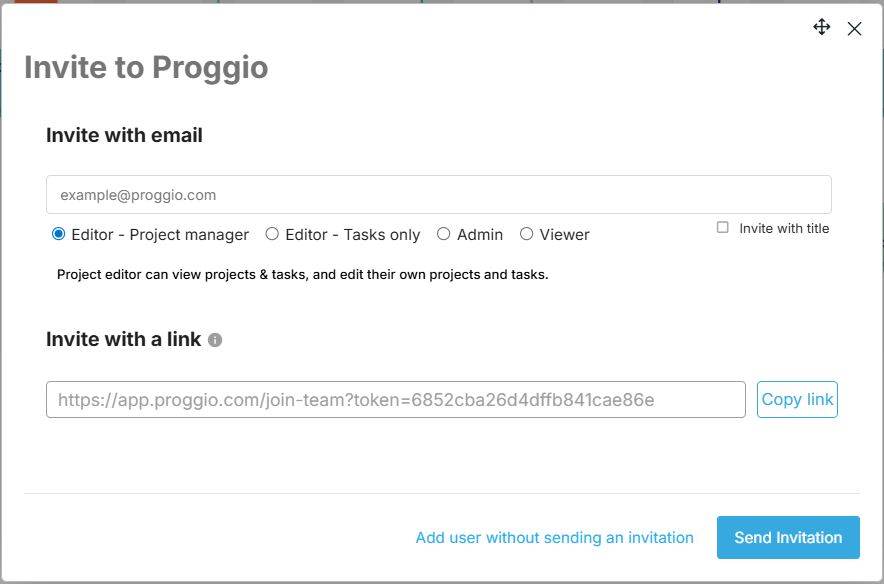
You can enter an email address and select a role for the new user.
Alternatively, share an invitation link that allows people to join directly.
Additionally, you can add users without sending an invitation, which is useful for pre-assigning work before the team is ready.
User Roles
| Role | Permissions |
|---|---|
| Editor – Project Manager | View and edit all projects and tasks |
| Editor – Tasks Only | View projects, edit only assigned tasks |
| Admin | Full access including workspace settings |
| Viewer | View-only access to projects and tasks |
Pro Tip: Use “Add user without sending an invitation” to assign work while you finalize the plan. Later, invite them when everything is ready.
For more details, see: Inviting and Managing Users in Proggio
Quick Reference for Getting Started with Proggio
Structure Your Project
- Workstreams — Organize by teams, departments, or phases
- Tasks — Add work items with durations on the timeline
- Subtasks — Break down tasks into actionable to-dos
- Milestones — Mark key dates and achievements
- Dependencies — Link tasks so changes propagate automatically
- Buffers — Show slack time between dependent tasks
Manage Tasks Efficiently
- Timeline View — Plan and edit tasks in context
- Board View — Drag and drop for Kanban-style updates
- List View — Bulk edit and filter in a spreadsheet format
- Backlog — Collect unscheduled tasks for later
Collaborate With Your Team
- Assign Work — Use the Assignee field in task properties
- Tag & Notify — Use @mentions in comments
- Invite Users — Add teammates with appropriate roles
Use AI Assistance
- Suggest Workstreams — Let AI propose project structure
- Generate Tasks/Subtasks — AI creates detailed task breakdowns
- TimelineGPT — Chat with AI to restructure plans
Next Steps
Now that you’re oriented, explore these guides to go deeper:
- Managing Projects in Proggio
- Intro to Proggio’s Task Management
- Project Intake: Setup, Usage, and Best Practices
- Creating and Managing Dashboards in Proggio
- Timeline GPT: Your AI Partner for Project Fulfillment
- Proggio’s AgenticAI: AI Recommendations & Execution
Pro Tip: Use the ProjectMap™ for strategic planning and the Task Report for day-to-day execution—switching between them gives you both the big picture and the daily action view.