What Is a Project Intake?
Project Intake in Proggio is your organization’s project front door. Instead of starting every idea as a live project, Intake lets you:
- Collect requests or proposals in one place
- Review and prioritize them using standardized criteria
- Advance requests through a workflow with approvals and documentation
- Convert approved items into portfolio projects with all history intact
This process balances demand with capacity, ensures transparency, and improves alignment with business priorities.
Setting Up Intake
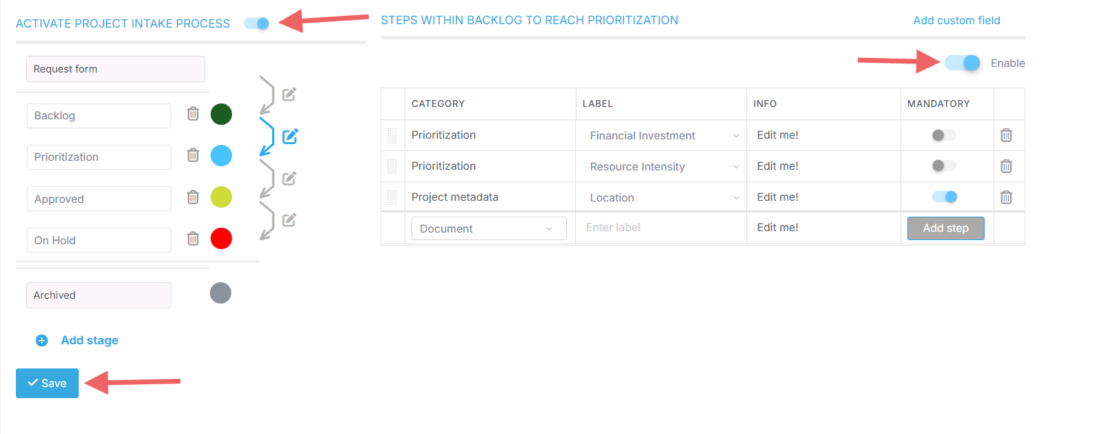
1. Define Workflow Stages
Navigate to Settings → Workflows → Intake.
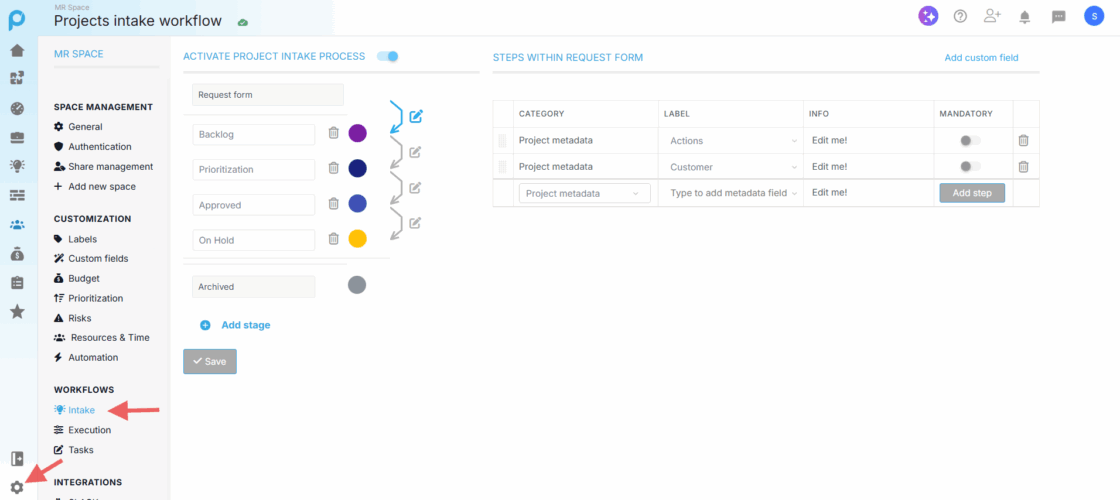
Here you can see and define the workflow stages of an intake project — the top stage will be the first workflow stage by default while the bottom will be the last
You can add stages that reflect your review process or remove ones that are unnecessary
Example pipeline:
Backlog – New requests/ideas are logged here before being reviewed.
Prioritization – Items are evaluated, compared, and ranked based on impact, urgency, or value.
Approved – Selected requests are validated and ready to move into execution as projects.
On Hold – Proposals that are valid but deferred for later consideration.
Stages can be color-coded and reordered for clarity.
Note: The Archived stage is mandatory in Proggio. It does not appear as a stage in the workflow list.
2. Add Protocols (Steps Requirements)
Define the actions that must be completed before a request can advance to the next stage. These requirements ensure consistency and prevent incomplete projects from moving forward.
Examples:
- Attach a Project Brief before moving to Business Case.
- Require Executive Sponsor approval before moving to Approved.
- Make Budget Estimate field mandatory before moving to Approved.
How to set it up:
- Click the edit icon next to the desired workflow.
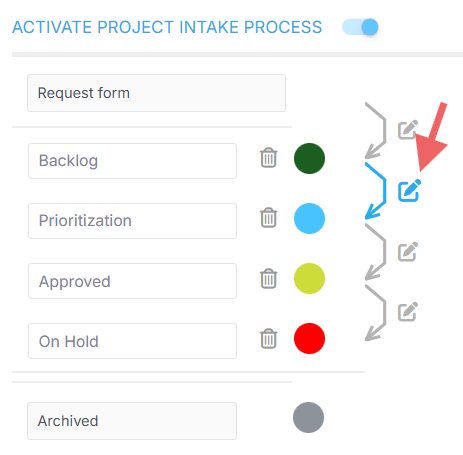
- The steps between stages will appear in a configurable list on the right-hand side of the screen.
- Add the necessary steps for moving the intake between the workflow stages.
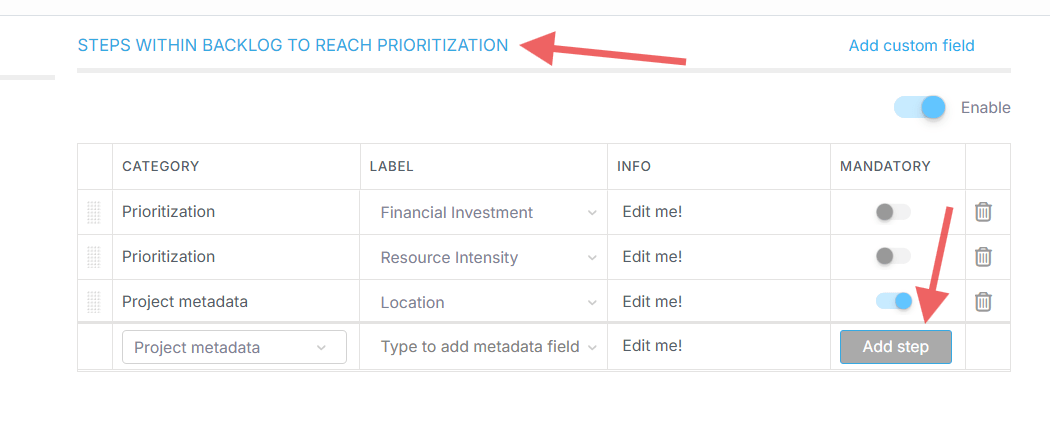
Types of steps you can add:
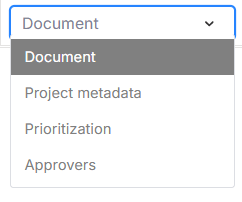
- Project Metadata Fields – force users to input specific information (e.g., Department).
- Prioritization Fields – help identify which intake items are considered higher priority.
- Document Uploads – require users to attach files via upload, Drive, or link.
- Approvers – designate another user with the right permissions to approve the stage change.
Make sure all required steps are enabled before clicking Save.
- The defined workflow applies globally across the workspace. All new project intakes follow this standardized process.
Submitting and Managing Requests
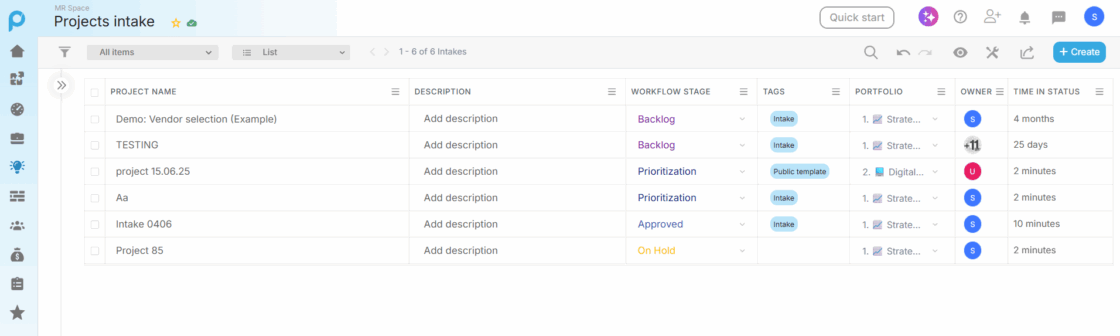
1. Access Intake
Click Projects Intake from the navigation panel (Lightbulb icon).
Choose:
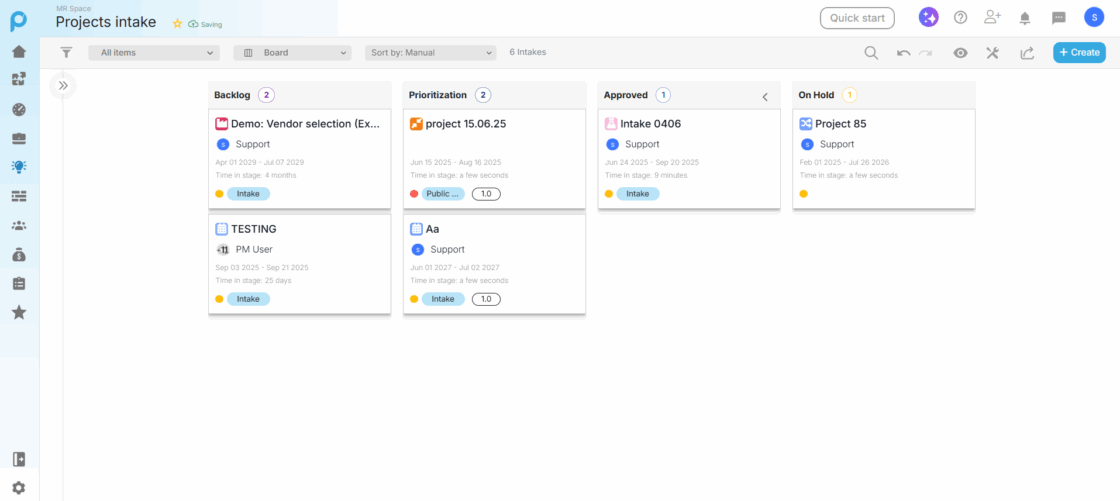
- List view for table-style visibility
- Board view for Kanban-style stage progression
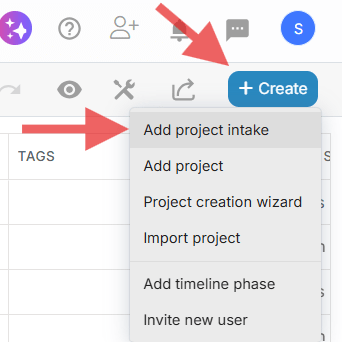
2. Submit a New Request
Click + Create and select Add Project intake
then fill out the intake form:

- Project Name: Name your project
- Portfolio: Select the relevant portfolio if multiples exist
- Template: Choose the appropriate template
- Required Data: Provide any mandatory information defined in the intake workflow
The request enters the first intake workflow stage (in the case of the example shared in this article – Backlog stage).
3. Collaborate on the Request
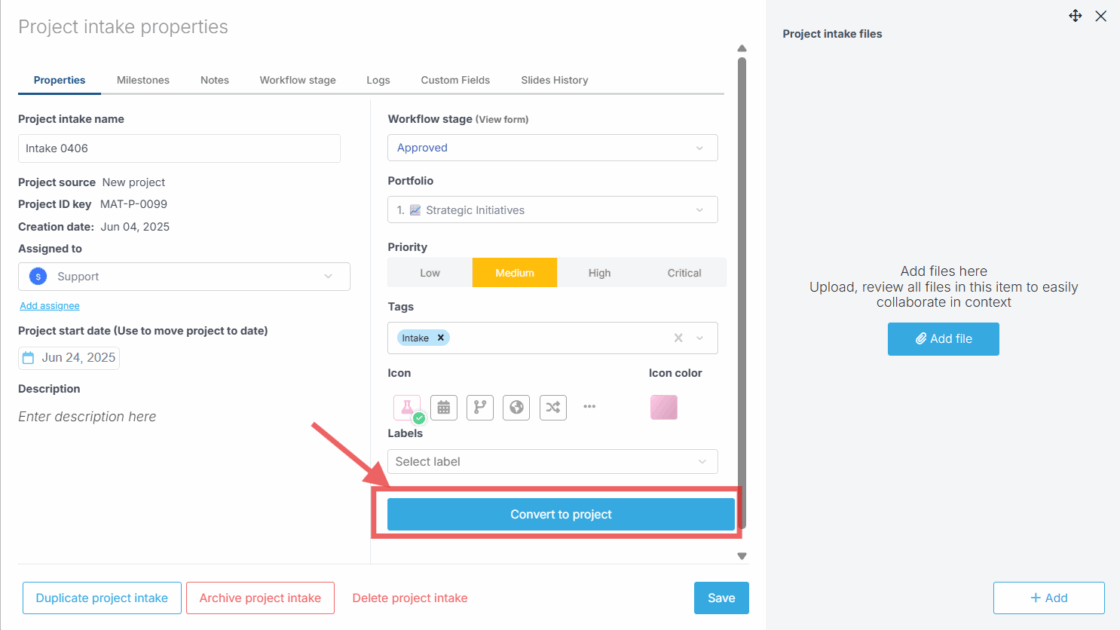
Open the project intake to review its details by navigating to the Project Intake Properties.
For example, in List view, hover over the intake project and click the small “i” icon to open the project properties.
![]()
Team members can:
- Add comments or questions for clarification
- Attach supporting files (charters, spreadsheets, screenshots)
- Update metadata as new information becomes available
- Optional: Navigate to the project intake itself and add a lightweight timeline or placeholder tasks (detailed planning is usually minimal until the project is approved)
4. Review and Prioritize:
Portfolio managers or the PMO should regularly review incoming intake items to ensure that proposals are assessed and acted upon in a timely manner.
Proggio provides several tools to make this process efficient:
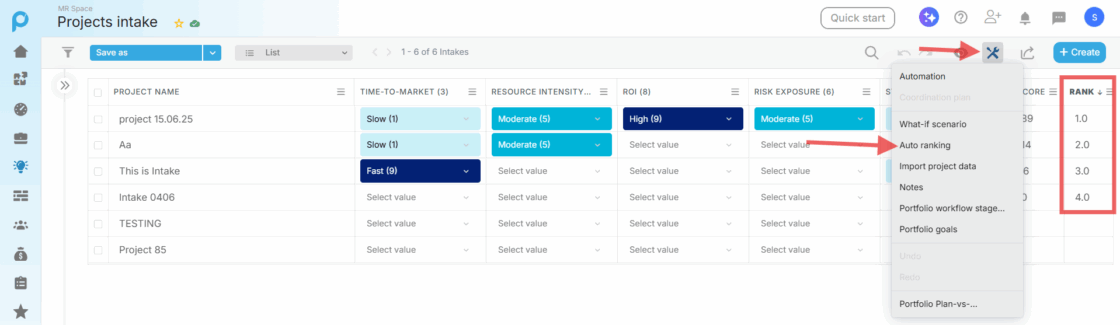
- Prioritization View: Found under Saved Views in the Projects Intake section.This view allows you to score or rank intake items based on criteria such as strategic value, ROI, Time-To-Market, or other custom metrics.
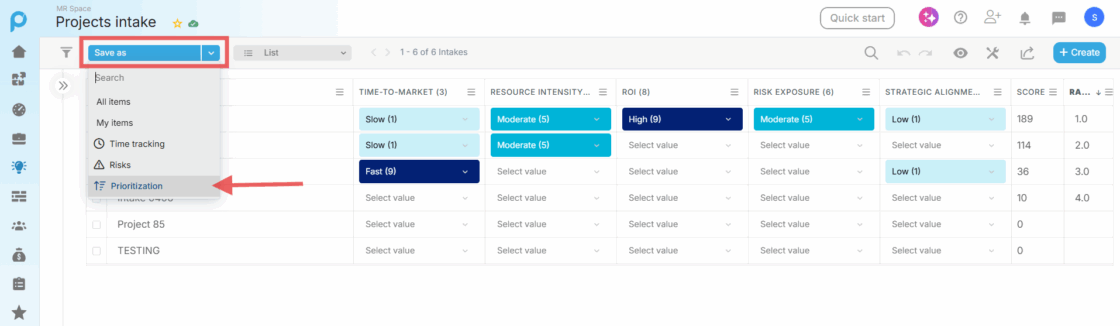
Click the tools icon and select Auto Ranking to automatically rank all intake projects by their score, with the highest-scoring project ranked first.
- Filtering and Sorting: Use custom fields (e.g., urgency, business value, location) to filter and organize project intakes, helping you focus on the most critical proposals.For example, you can filter your project intakes by a Location custom field.

- Regular Review Meetings: Schedule periodic intake review sessions (e.g., monthly) to discuss, evaluate, and decide on proposals, ensuring that valuable ideas do not stagnate.
By leveraging these tools, your team can objectively compare intakes and decide which projects should be approved, fast-tracked, or deferred.
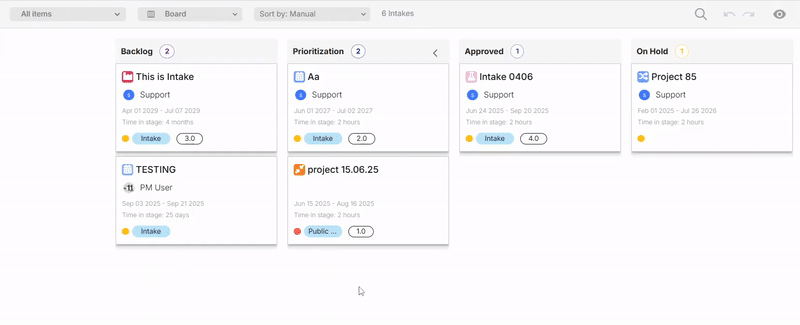
5. Moving Through Workflow Stages
In Intake Board view, drag the intake card from one stage to the next. Proggio enforces protocols automatically according to the Intake workflows we configured.
Example:
- In this space, we have configured that moving an intake project from Prioritization stage to Approved stage triggers a mandatory addition of a document, labeled: “Attach Business Case PDF”.
In the Board view, when trying to move the intake project to the Approved stage, a workflow form will appear, indicating that you need to “Attach Business Case PDF”.
The intake cannot advance to the next workflow stage without providing the necessary document.
6. Converting Intake to Project
When ready, you can convert your intake into an execution project in several ways:
- From Project Intake Properties: In the first tab, under Labels, click the blue button Convert to Project.
- List View: Hover over the intake name, click the three dots that appear, and select Convert to Project.
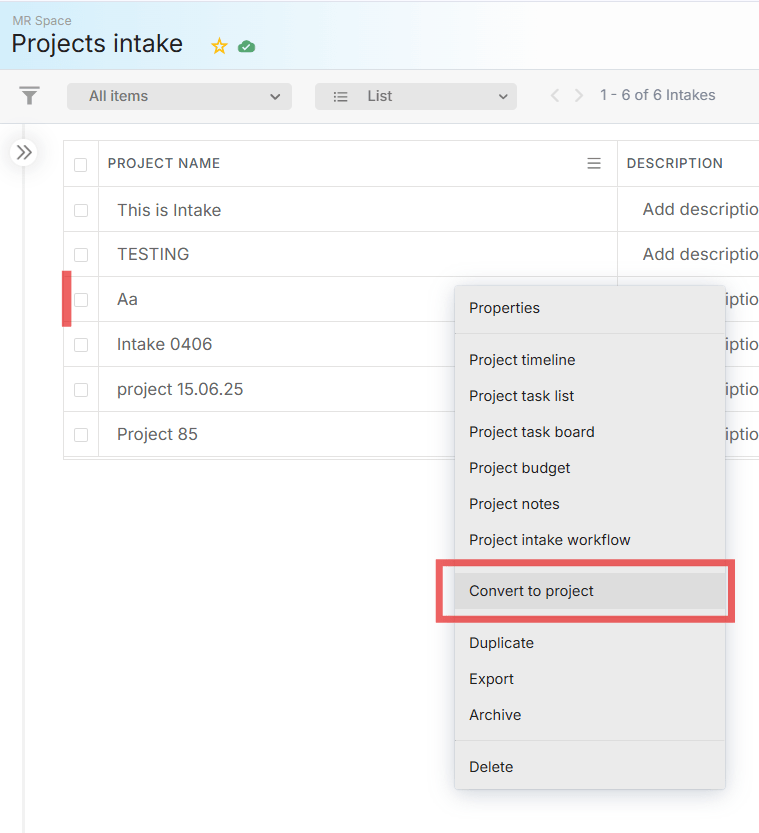
- Board View: Right-click on the intake and select Convert to Project.
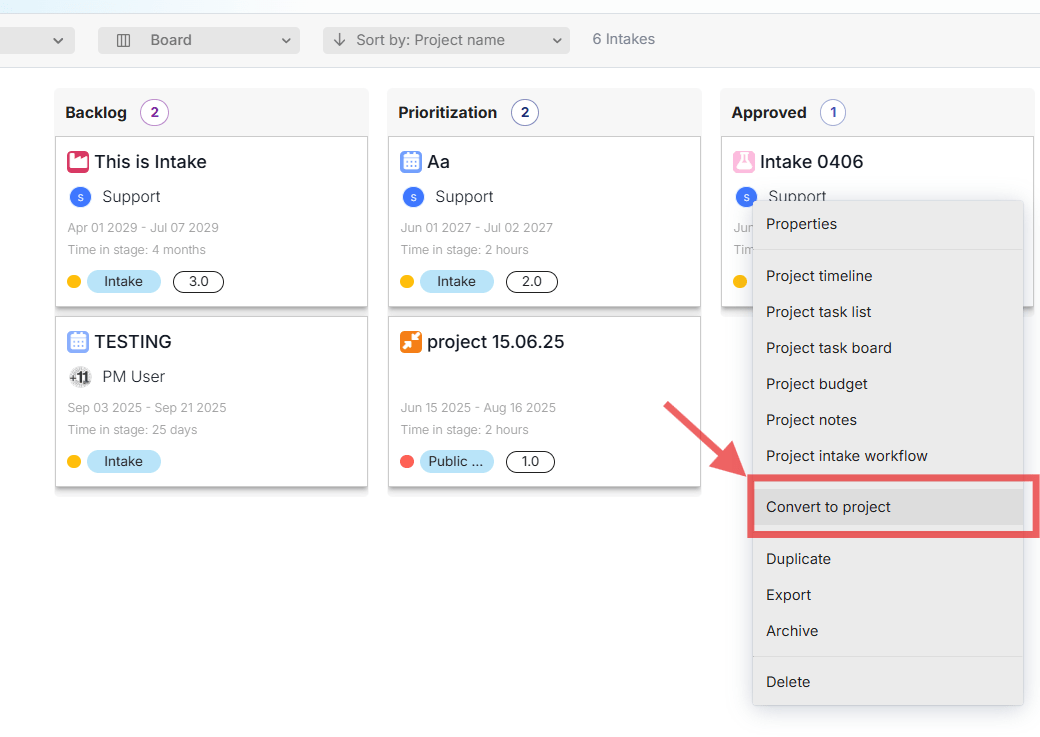
Once you click, you will be prompted with a form to convert the intake to a project. The form fields are the same as when creating a new execution project.
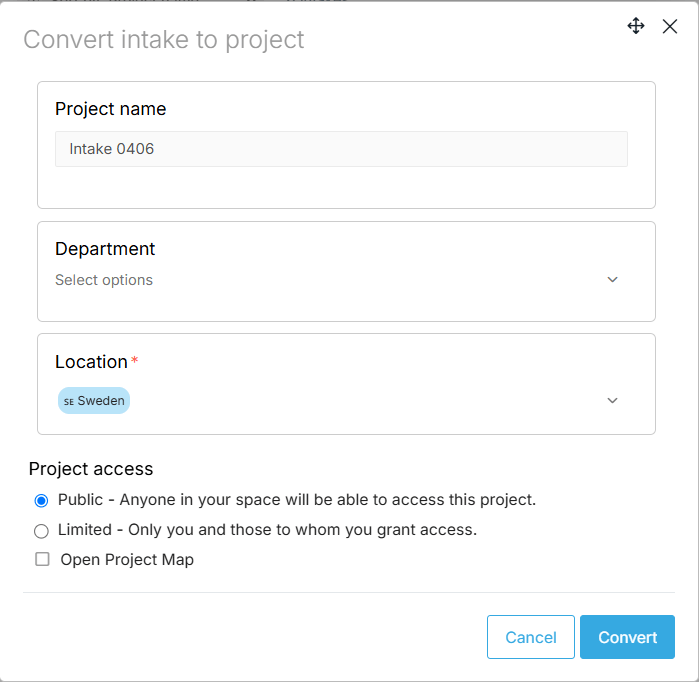
After filling out the form and clicking Convert, the intake project becomes a regular project and will be displayed under the Portfolio view.
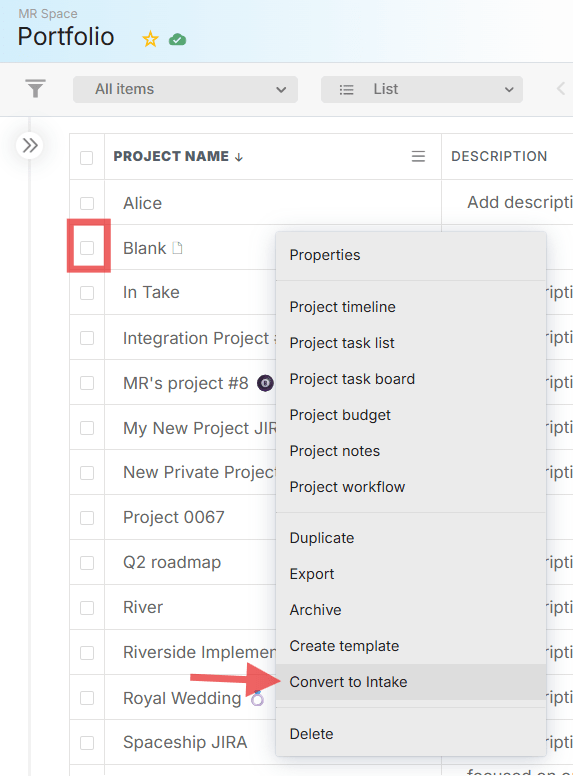
Note: You can reverse the process and convert the project back to an intake by navigating to the Portfolio list view, hovering over the project’s name, and selecting Convert to Intake.
Key Configuration Tips for Effective Implementation
- Mirror Your Process with Custom Stages: Customize intake stages to reflect your decision-making workflow. Start simple (e.g., Submitted → Approved → Executing) and evolve as needed. Make stage names intuitive for all users (e.g., New Request, PMO Review, Steering Committee Approved).
Enforce Entry Criteria with Protocols: Define mandatory requirements for advancing stages. For example, moving from “Prioritization” to “Approved” might require a cost estimate and executive sponsor approval. Proggio ensures proposals cannot advance without meeting these protocols.
Leverage Custom Fields: Capture key decision data such as Estimated Budget, Expected Benefits, Risk Level, or Strategic Alignment. Use these fields in portfolio views, filters, or prioritization scoring to compare proposals objectively.
Utilize Prioritization Tools: Use the Prioritization view to rank proposals based on ROI, strategic fit, urgency, and risk. Auto-ranking can order items so the highest-scoring proposals appear first.
Regularly Review the Pipeline: Schedule periodic intake review meetings (e.g., monthly) to ensure timely decisions. Visualize all intake items in Board view or dashboards, update statuses, and avoid letting ideas stagnate.
Assign Ownership: Designate an intake owner or reviewer for each proposal to shepherd it through the process, gather required info, and liaise with stakeholders.
Centralize Supporting Documents: Attach relevant files (charters, business cases, spreadsheets) to intake items. Required documents can be enforced as part of stage protocols to ensure completeness.
Keep the Intake List Clean: Archive, reject, or defer proposals that are not being pursued. This keeps the list focused on viable projects while preserving a record of declined ideas.
Common Use Cases
- Onboarding New Project Requests: Funnel all incoming project proposals through Intake to ensure consistent evaluation. Approved intakes convert to active projects in the main portfolio.
Capturing Change Requests: Log significant changes to ongoing projects as intake items. Use workflow protocols to enforce review and approval, maintaining a clear audit trail.
Managing Idea Submissions: Collect and review employee suggestions in the Intake backlog. Evaluate feasibility and strategic fit, then promote the best ideas to approved projects while archiving less viable ones.